This post demos how to make a distance calculator on Streaming Data Platform
Introduction
- Local deployment of InfluxDB+Grafana+Pravega+IoT GW
- Optional: Connect Raspberry Pi 4 and run the app to collect the data in json format via a distance sensor
- Using local IDE (Or local Flink cluster) to run Flink Distance Calculation Job
- Fixed window
Calculate the average value of each fixed time window (3s)
- Distance Calculation logical
Normal: <=1m A little Far: > 1m && <= 3m Far: > 3m
- Fixed window
Demo environment

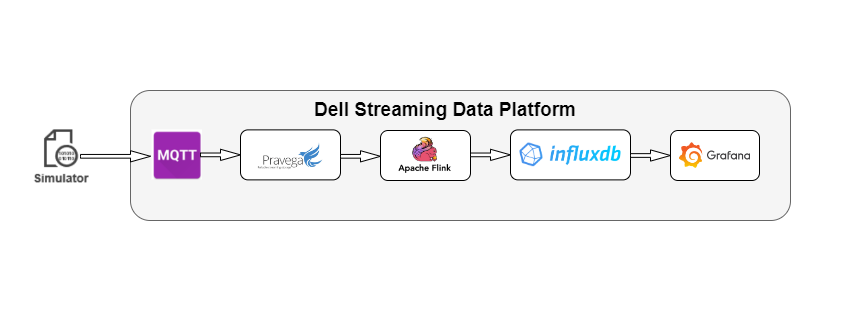
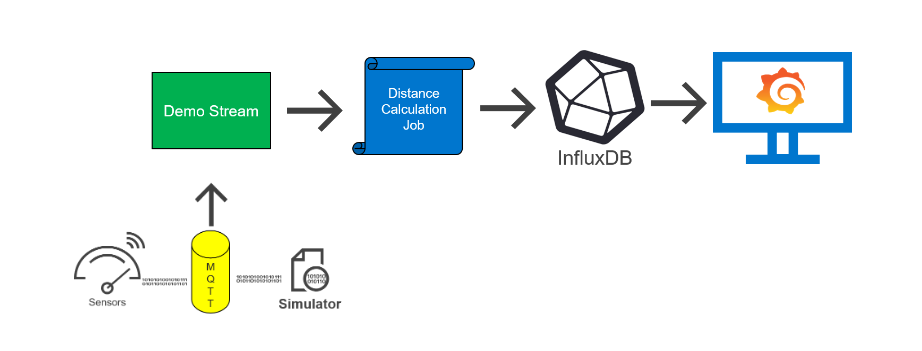
Workload Flow
- We fully utilize SDP platform from start to end
- Collect Distance sensor data via a MQTT Sensor or Use simulator to generate the data from one CSV file and write into one MQTT topic
- Which further writes it into the Pravega Stream via Pravega Writer API
- Flink Job read the data from stream using Pravega Reader API
- Computing and processing in each fixed 3 time window
- Sink to Influx DB
- Grafana can Visualize the Output with custom dashboard
Prerequisites
- Clone sdp-starter-kit
- Java 11
- Maven 3.6.3
- Helm
- SDP Running in a Cluster
- Flink 1.15.2 runtime
Setup distance calculator demo using Helm
- The Helm charts for distance calculator demo is in
cd sdp-starter-kit/distance-calculator/charts/ - Get all available runtime images using the below command.
kubectl get runtimeimages -A
Update flinkImage variable in calculator/values.yaml with the runtime image name available for the flink version 1.15.2.
- Get spec.values.image.tag using below command.
kubectl get projectfeature pravegamqttbroker --output="jsonpath={.spec.templates.pravegaMQTTBroker}"
Update chartVersion variable in features/values.yaml with spec.values.image.tag.
- Deploy distance-calculator and mqtt-writer by running below script.
./deploy.sh <name_of_the_application>ex:- ./deploy.sh distance-calculator
Wait for few minutes until flink application starts
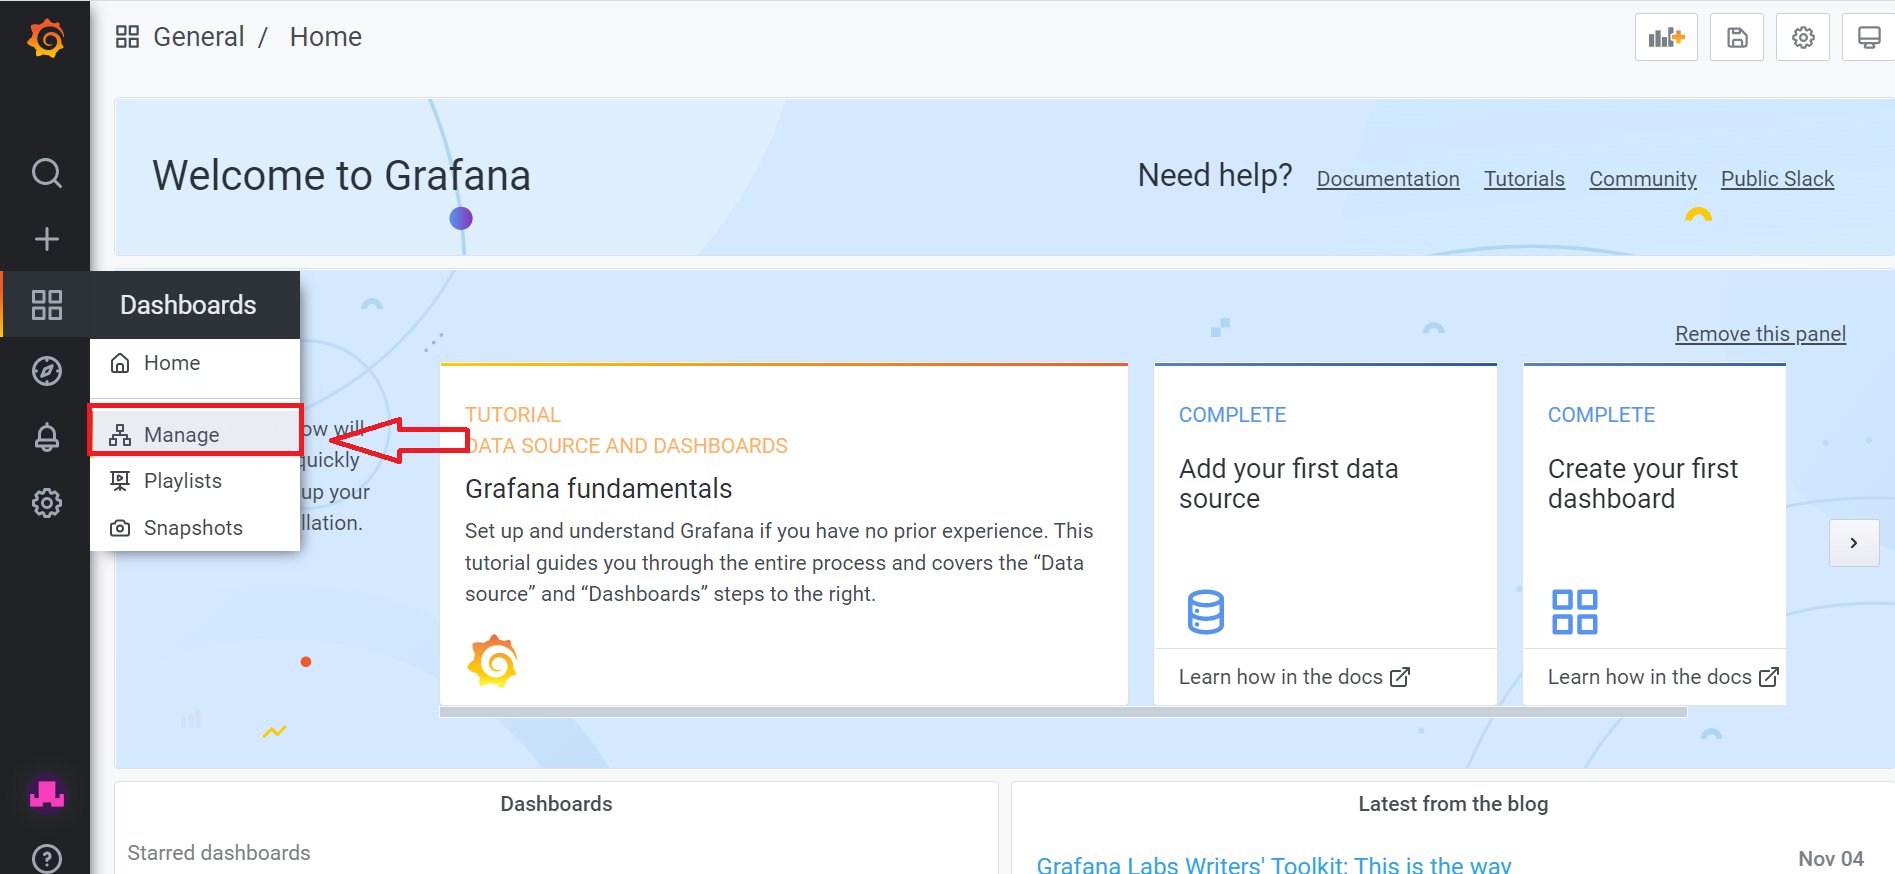
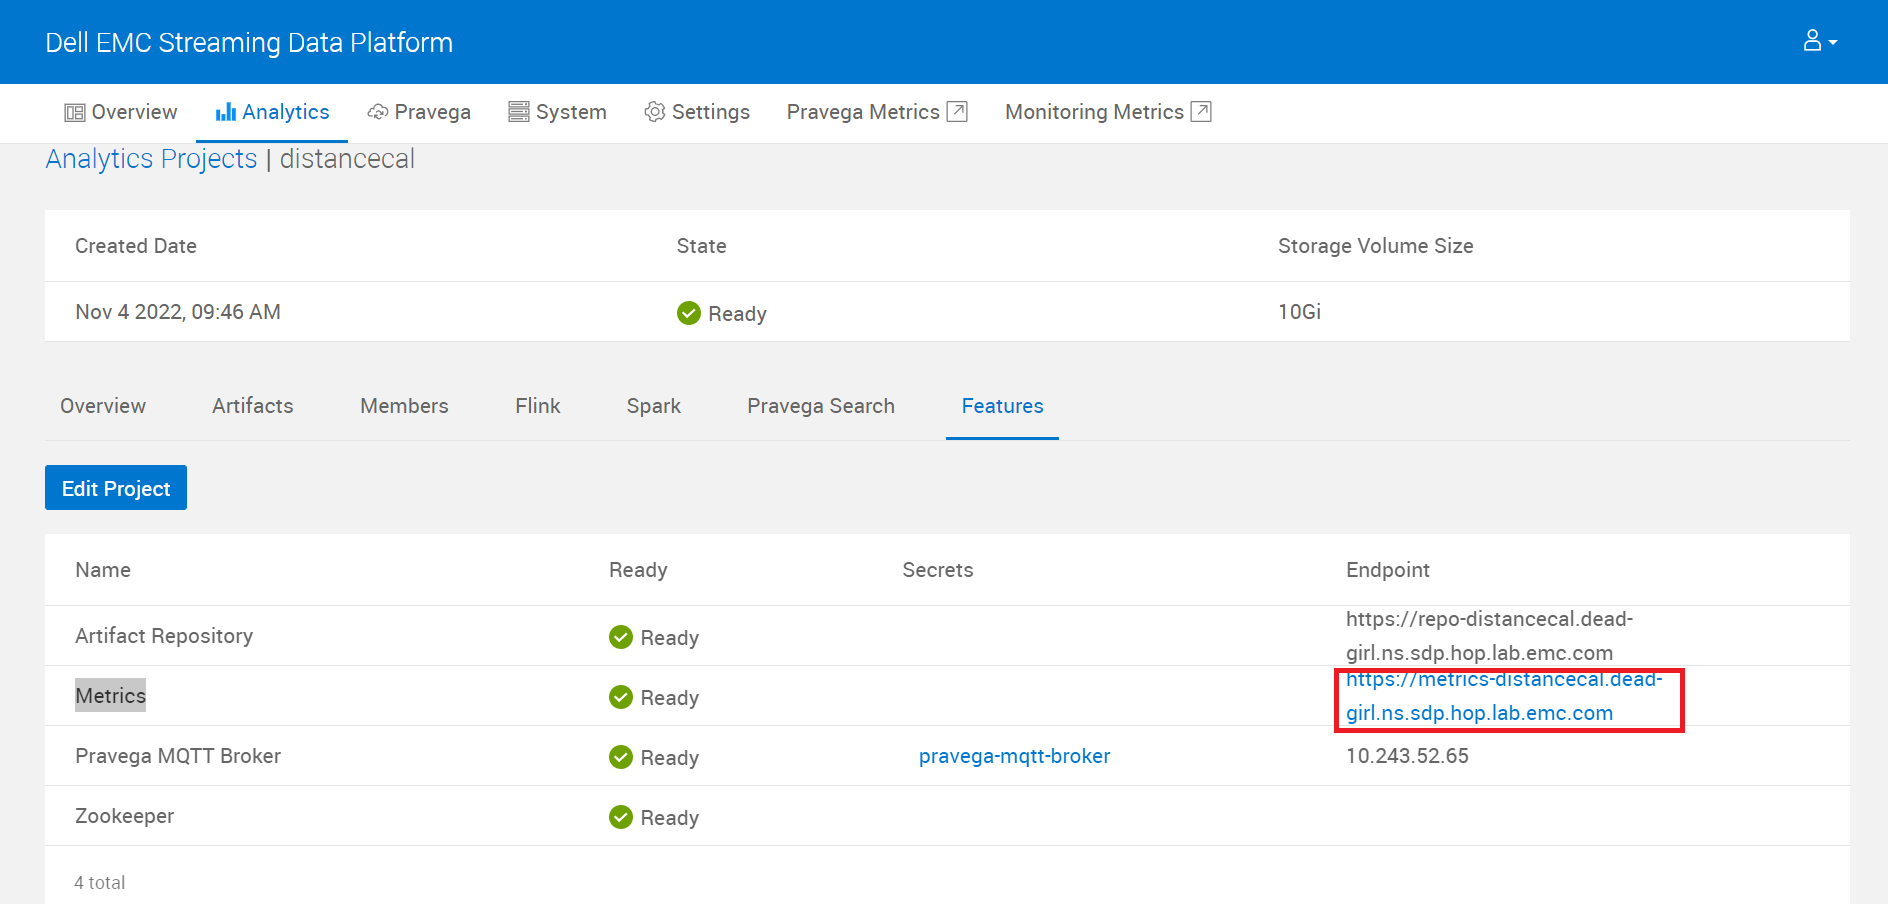
- To visualize dashboard navigate to Analytics → Your Project → Features
- Open Metrics endpoint

- Hover on Dashboard and Click on Manage
- Click on Distance Calculataor Dashboard
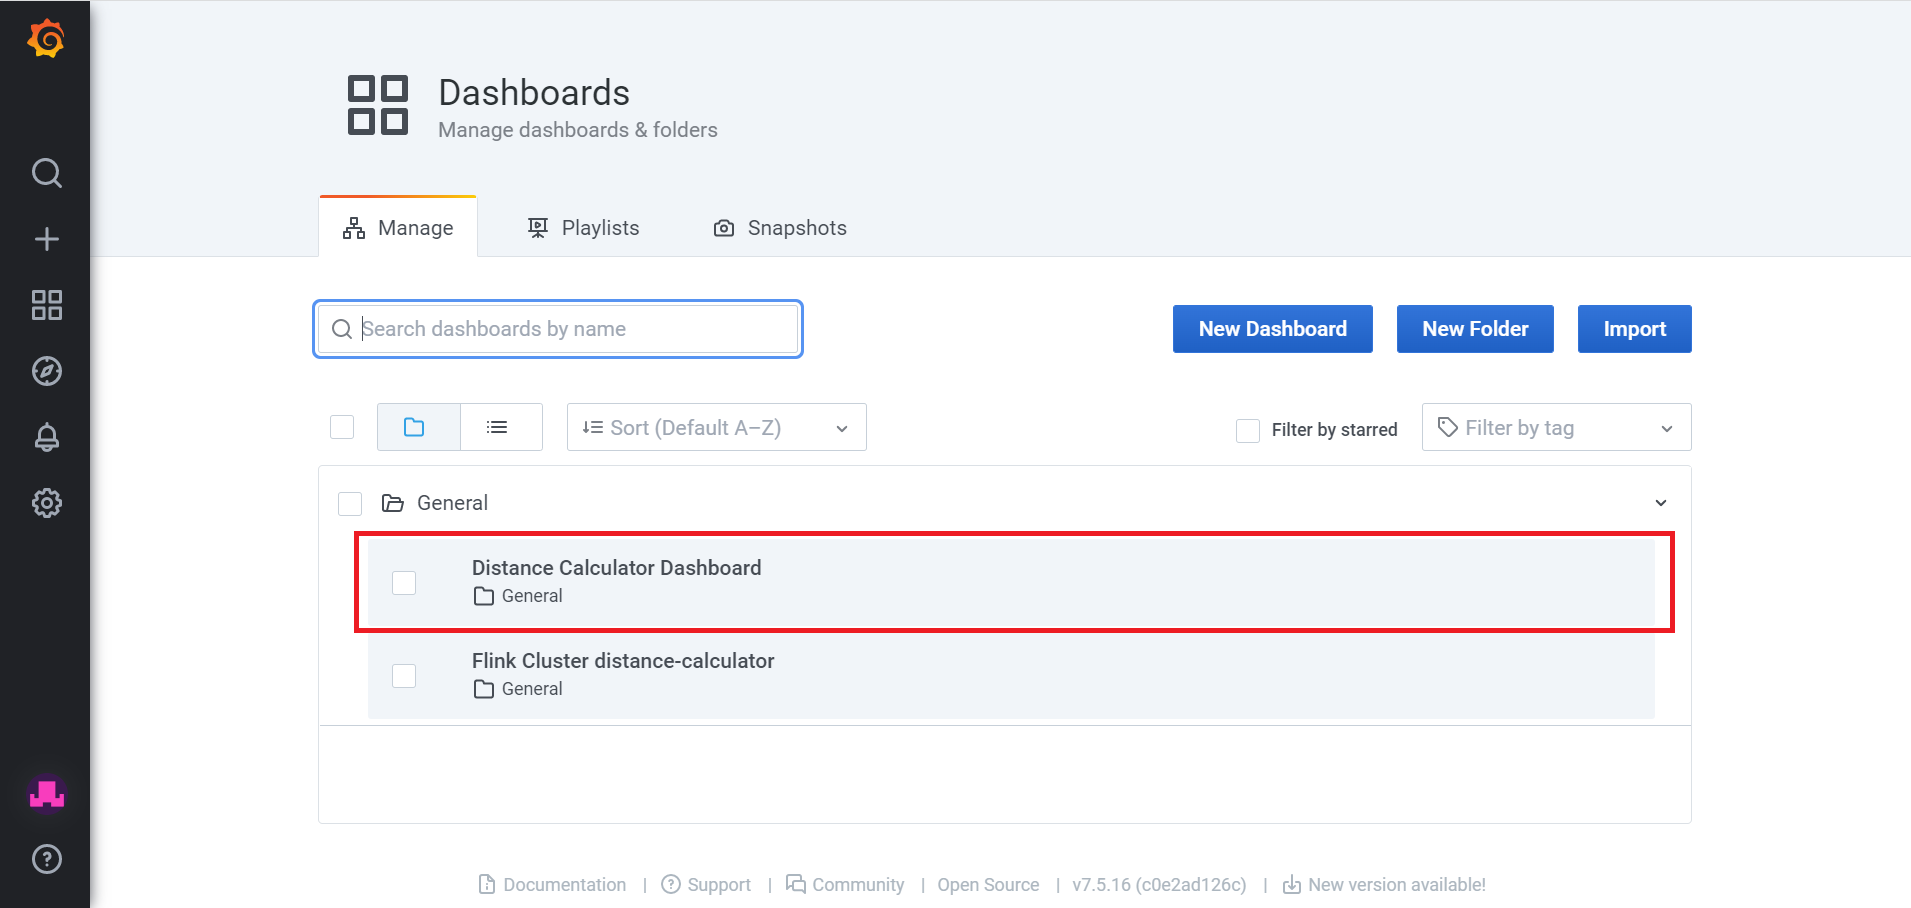
-
Below view can be observed
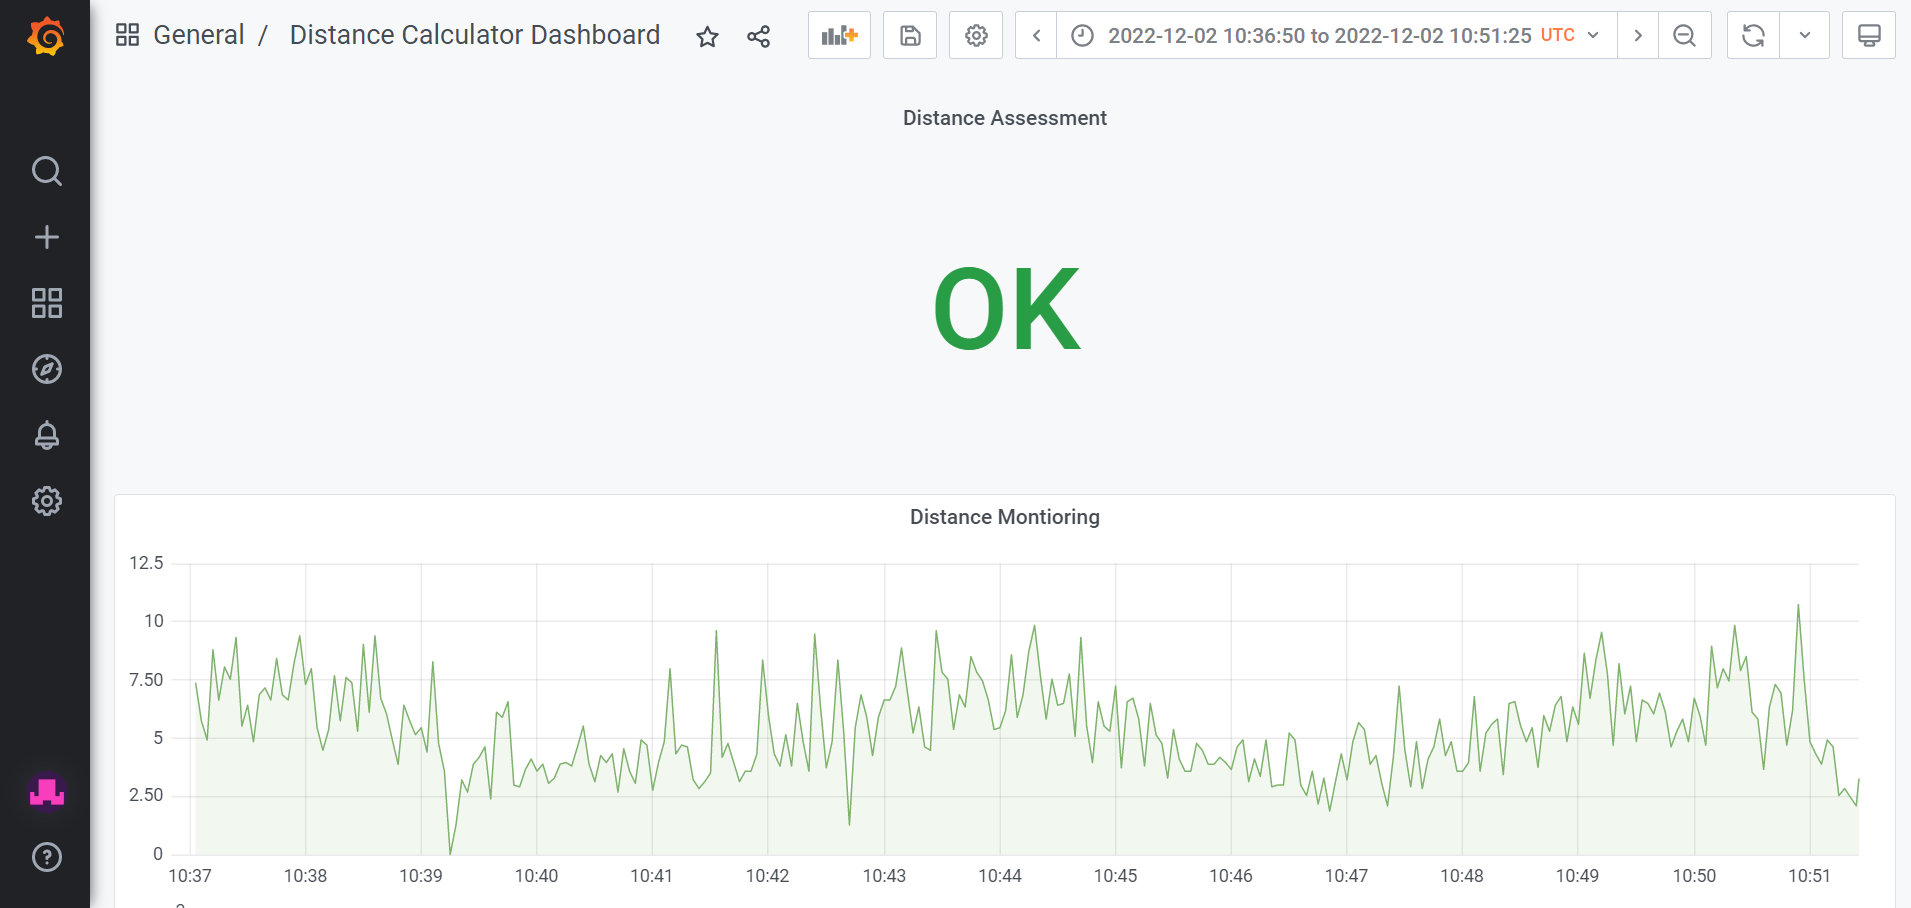
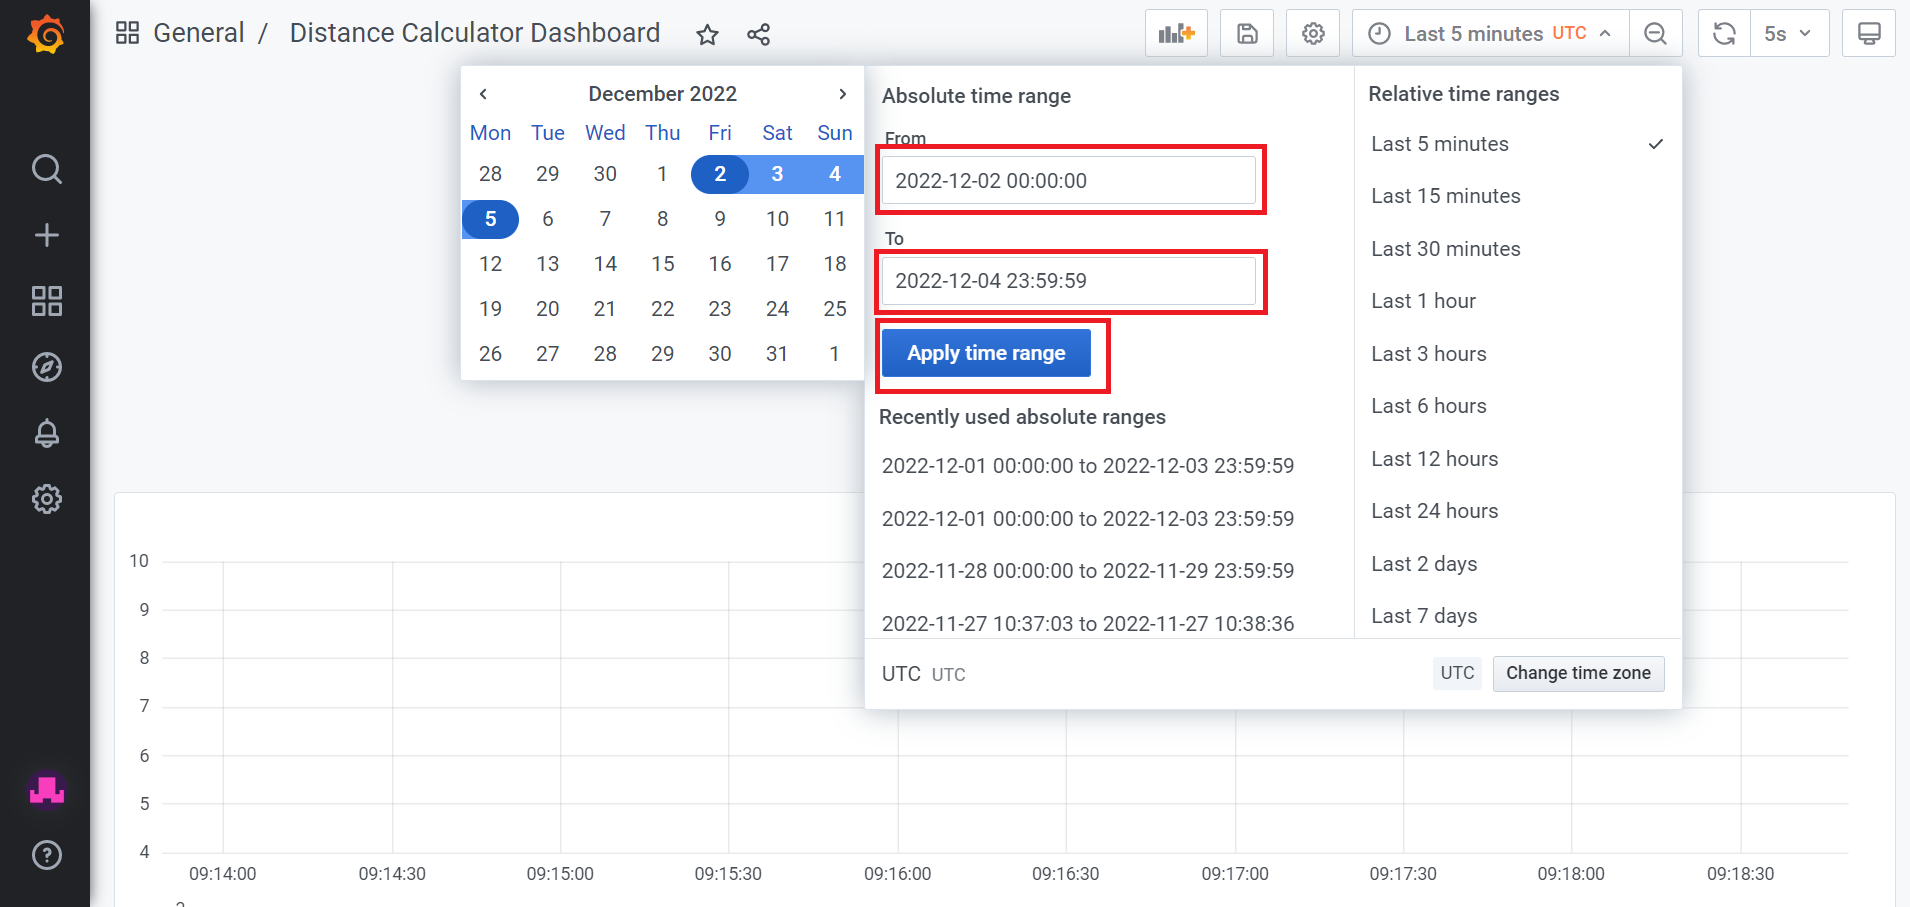
Note:- In case if you don’t see any graph or button to Zoom to Data, Apply the time range of 10:37:00 to 11:00:00 for the current date
Setup distance calculator demo manually
1. Compile distance-calculator project
- Use below command to package and create jar file
  cd distance-calculator
  mvn clean package
2. Setup SDP
- Navigate to Analytics
- Click on New Project
- Select Artifact Repository, Metrics, Pravega MQTT Broker, Zookeeper from the Features dropdown
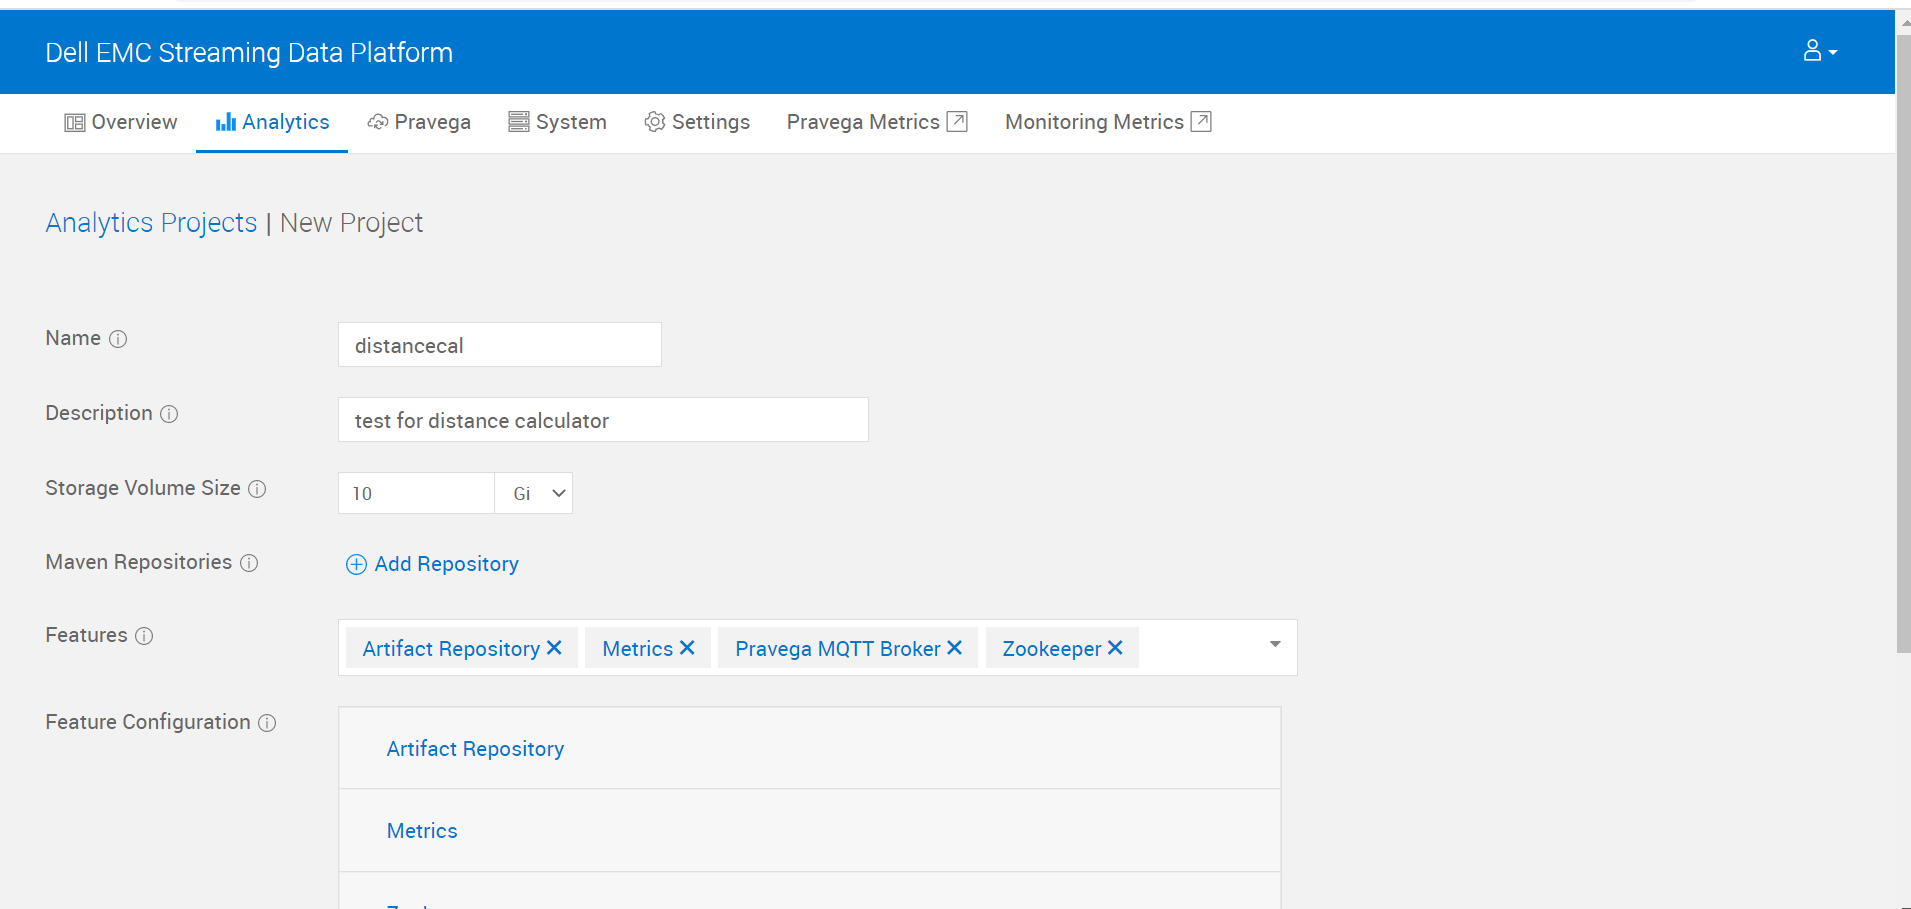
- Click on Save button and wait for the project to deploy
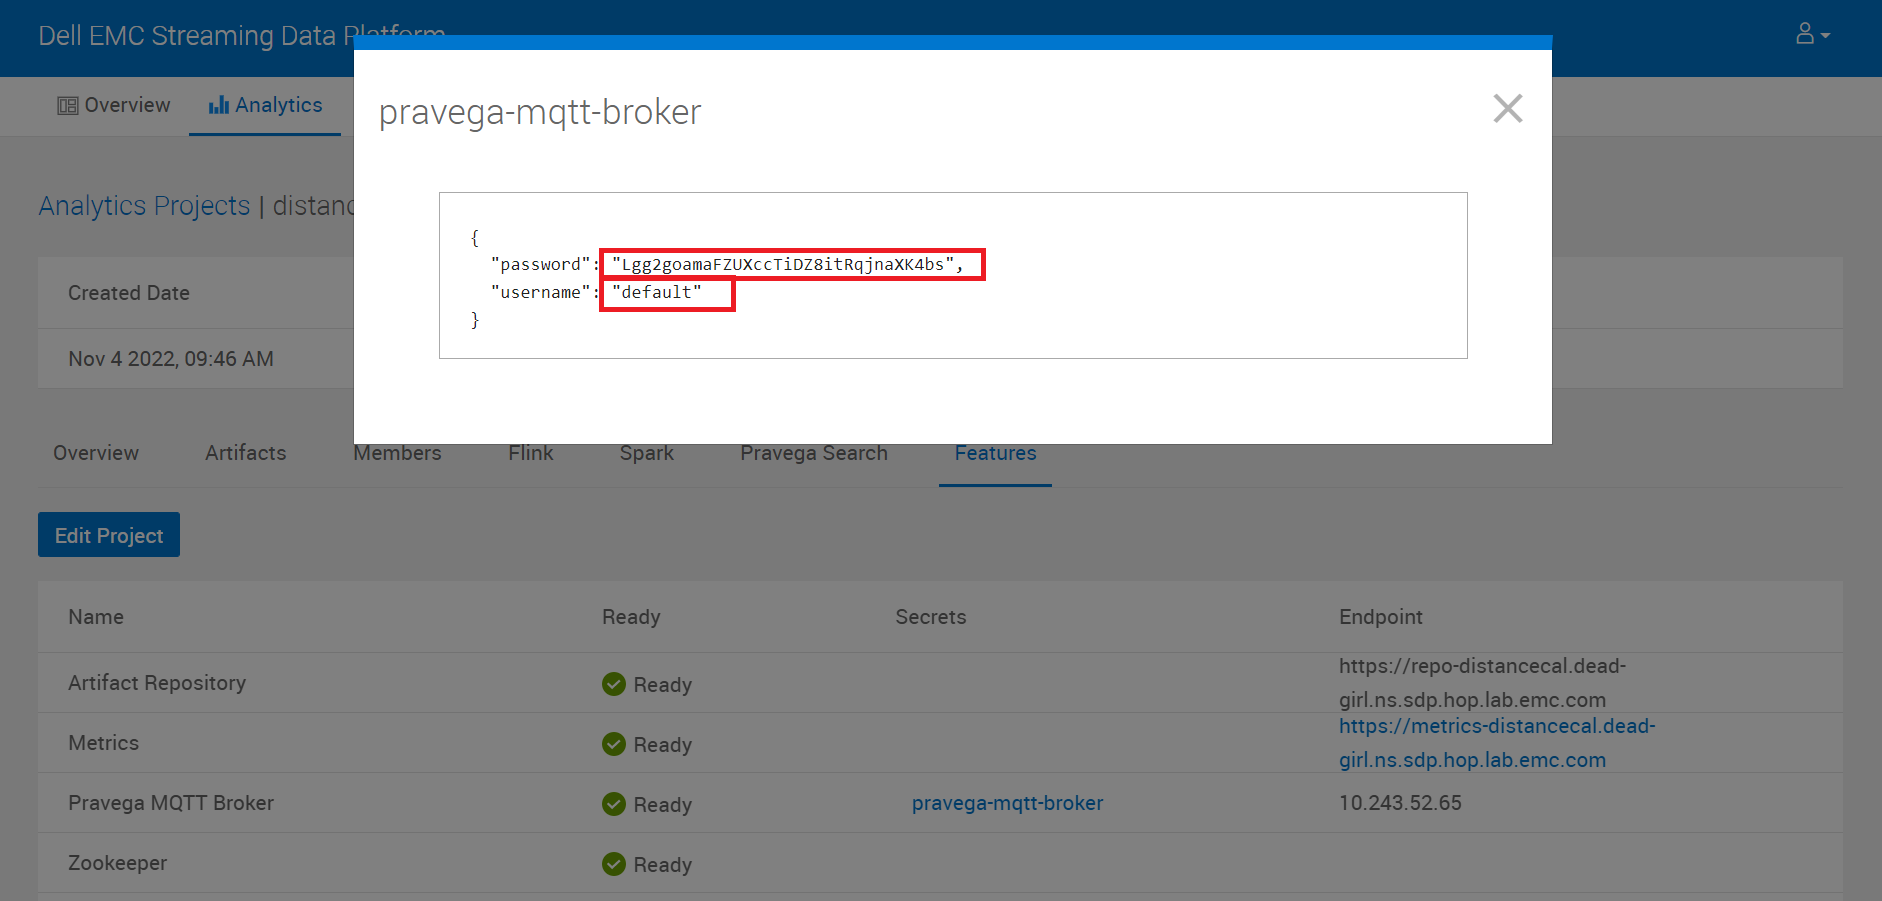
- To get MQTT_BROKER_URL, MQTT_USERNAME and MQTT_PASSWORD
- Navigate to Analytics → Your Project → Features
- IP in the “Endpoint” section corresponding to “Pravega MQTT Broker” with port 8883 forms MQTT_BROKER_URL. ex: 10.243.52.65:8883
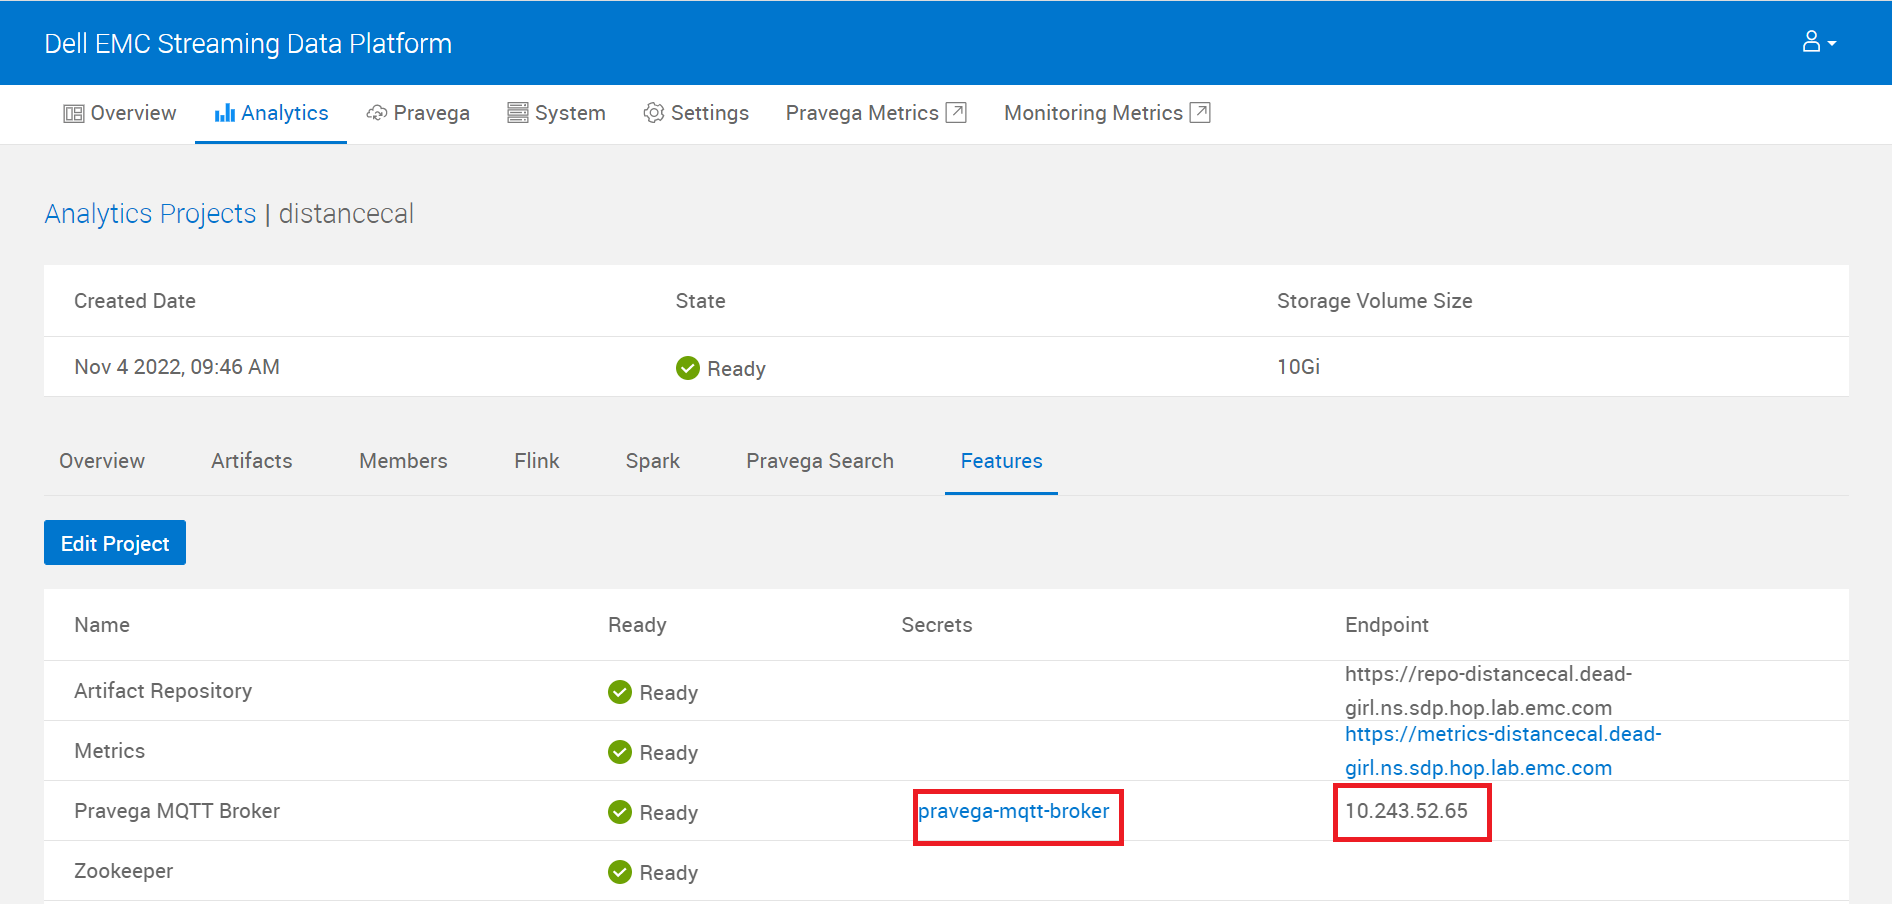
-
Click on pravega-mqtt-broker in the “Secrets” section to get MQTT_USERNAME and MQTT_PASSWORD
- Upload Jar file to Artifacts
- Navigate to Analytics → Your Project → Artifacts → Files
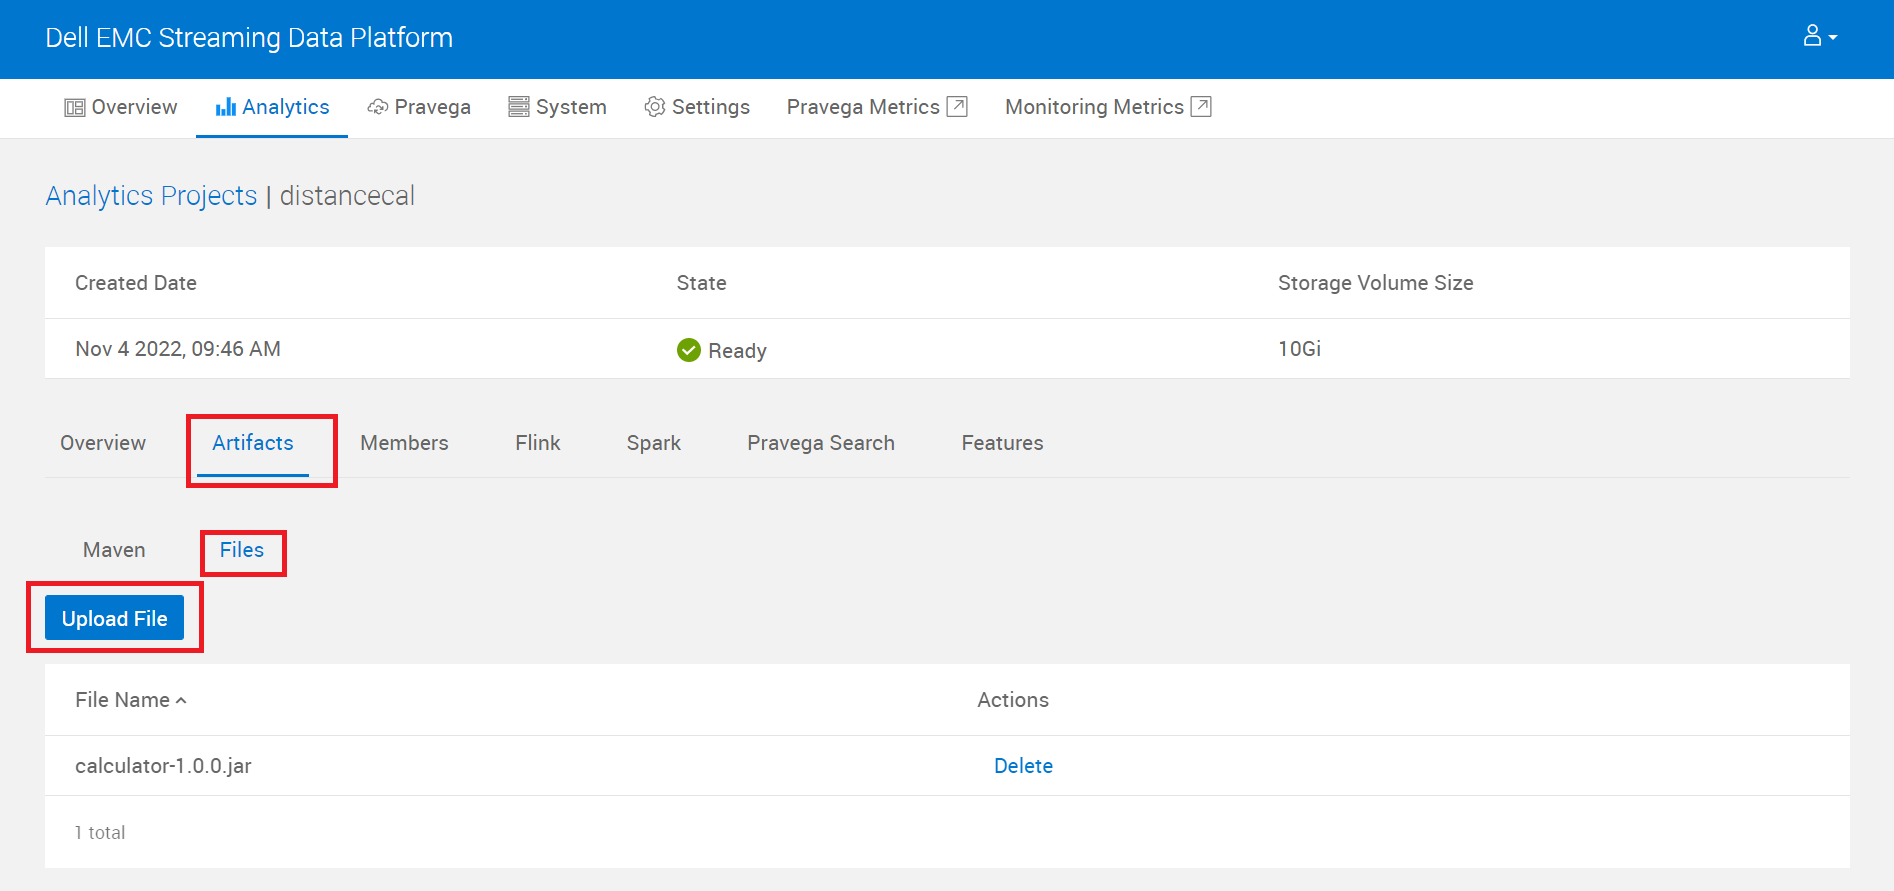
- Upload the jar file from –> /
/distance-calculator/calculator/target/calculator-1.0.0.jar
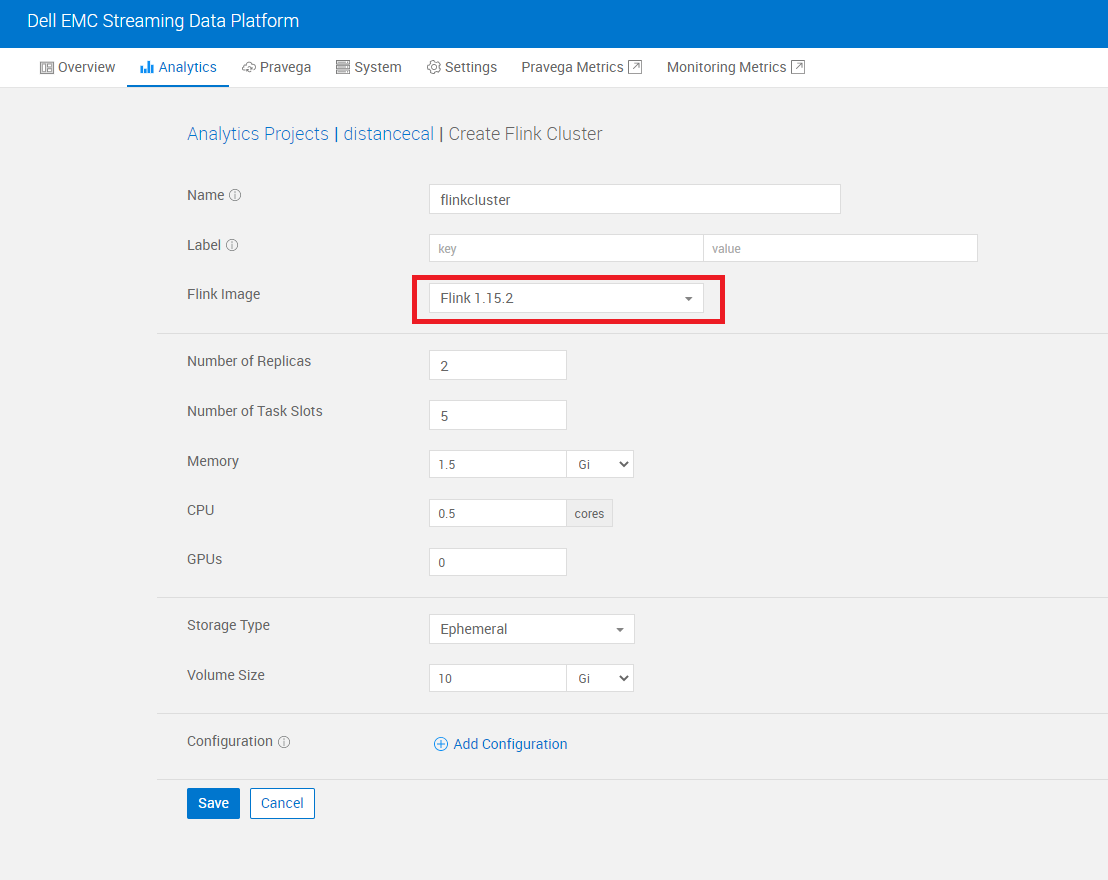
3. Create Flink Cluster
- Navigate to Analytics → Your Project → Flink → Create Flink Cluster
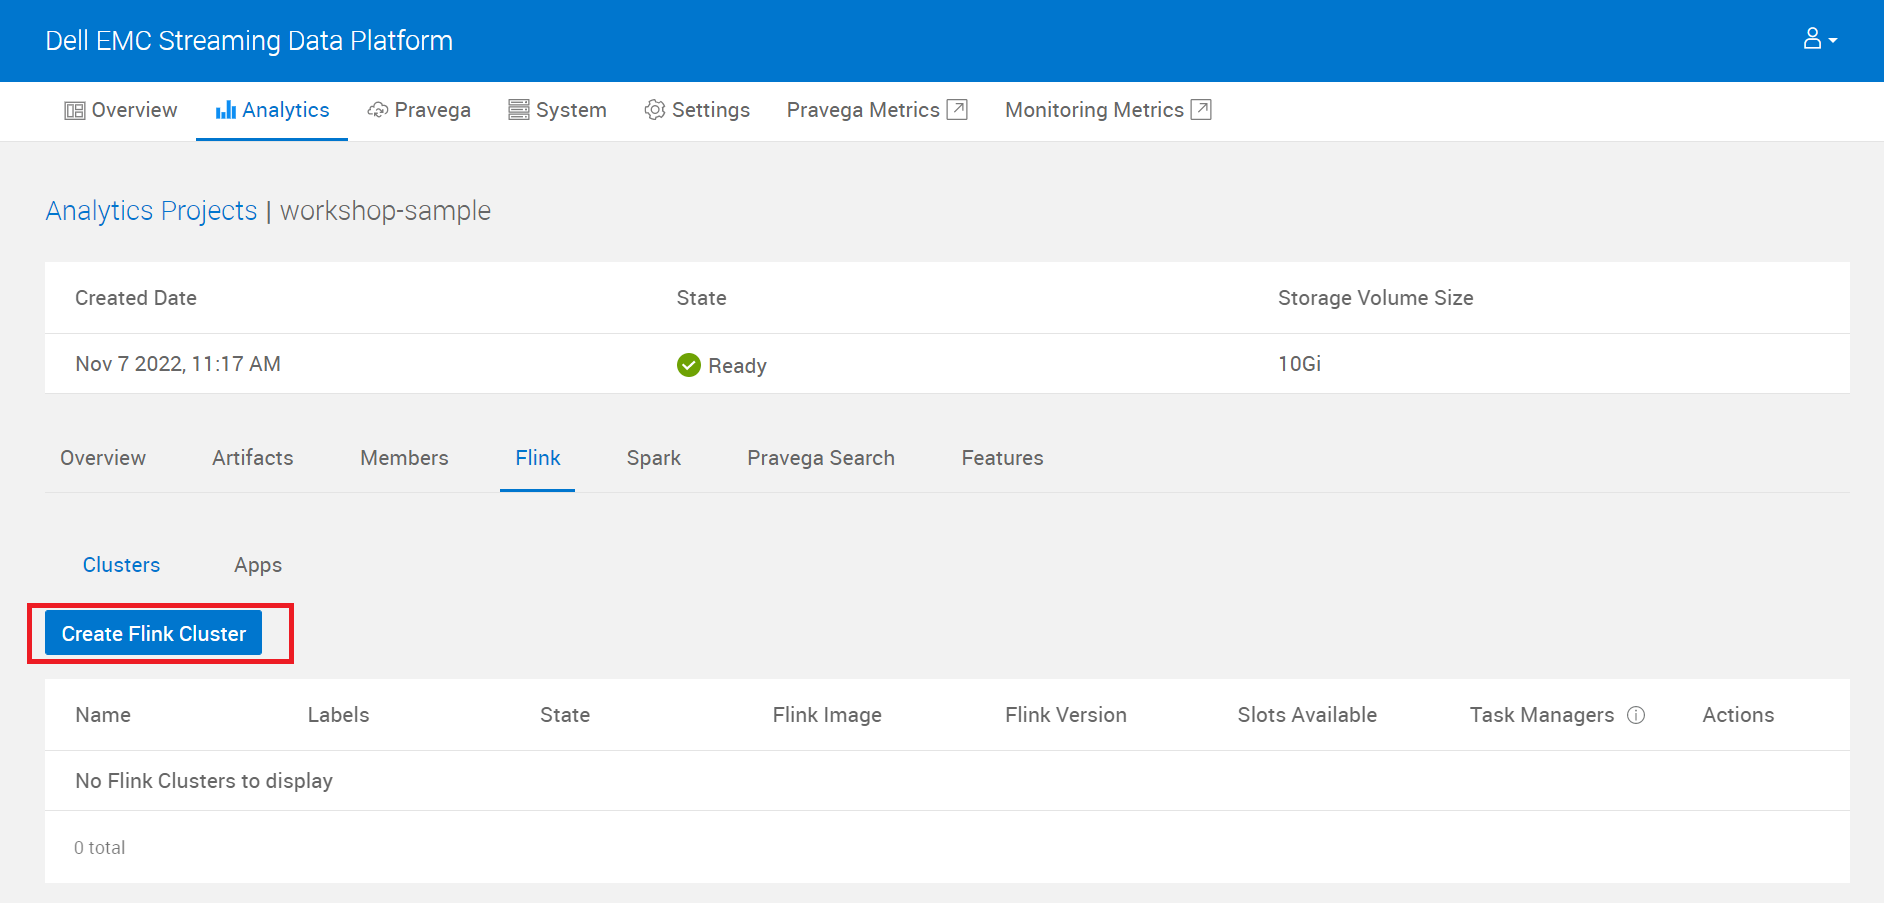
- Select Flink version 1.15.2 and Click Save to create Flink Cluster
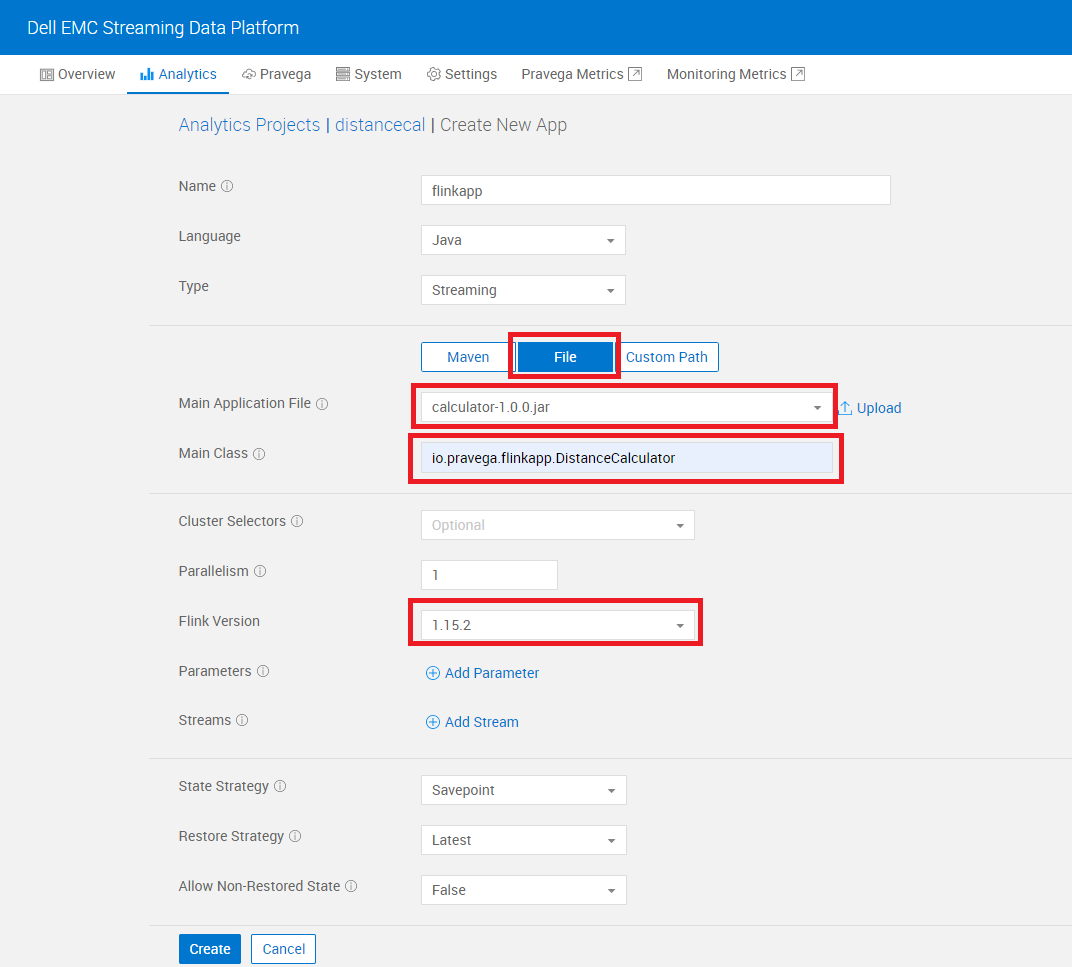
4. Run Flink application
- Click File
- Select Main Application from dropdown
- Type main class as io.pravega.flinkapp.DistanceCalculator
- Select Flink Version – 1.15.2
- Click Create and wait for the app to Start
5. Set the Environment variables
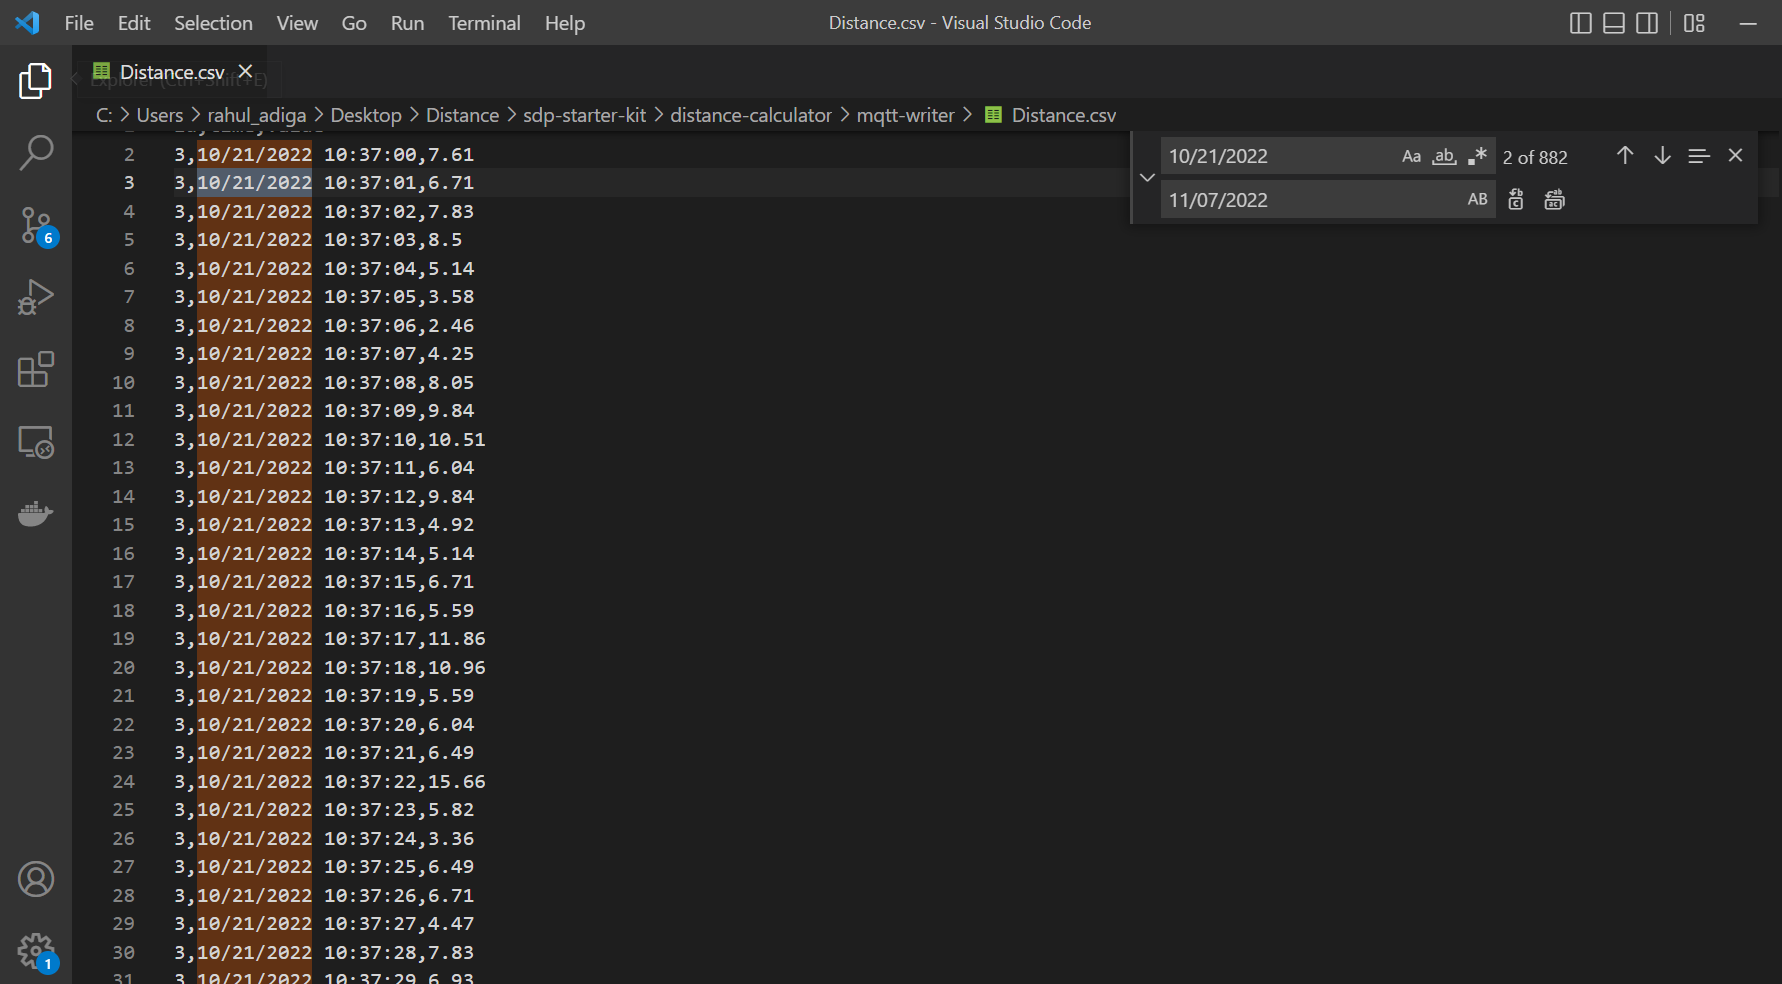
- Note: - Edit Distance.csv and replace with current dates (To avoid retention policy error– DATA is only valid for 7 days)
Below Image shows replacing of dates to Today’s date
- In Windows
set MQTT_BROKER_URL=tls://<MQTT_BROKER_URL>:8883 set MQTT_ALLOW_INSECURE=true set MQTT_DATA_FILE=C:\\<Project_Path>\\mqtt-writer\\Distance.csv set MQTT_USE_AUTH=true set MQTT_USERNAME=<MQTT_USERNAME> set MQTT_PASSWORD=<MQTT_PASSWORD> - In Linux/Ubuntu
  export MQTT_BROKER_URL=tls://<MQTT_BROKER_URL>:8883
  export MQTT_ALLOW_INSECURE=true
  export MQTT_DATA_FILE=/<Project_Path>/mqtt-writer/Distance.csv
  export MQTT_USE_AUTH=true
  export MQTT_USERNAME=<MQTT_USERNAME>
  export MQTT_PASSWORD=<MQTT_PASSWORD>
6. Simulate the MQTT writer
- Use below command to run MQTT writer simulator
java -jar mqtt-writer\target\mqtt-writer-1.0.0.jar
7. Get Influxdb Data Source
- Navigate to Analytics → Your Project → Features
- Go to Setting → Data Source and Get Influxdb Data Source name and copy data_souce_name (disatanceflink_flnk in below image)
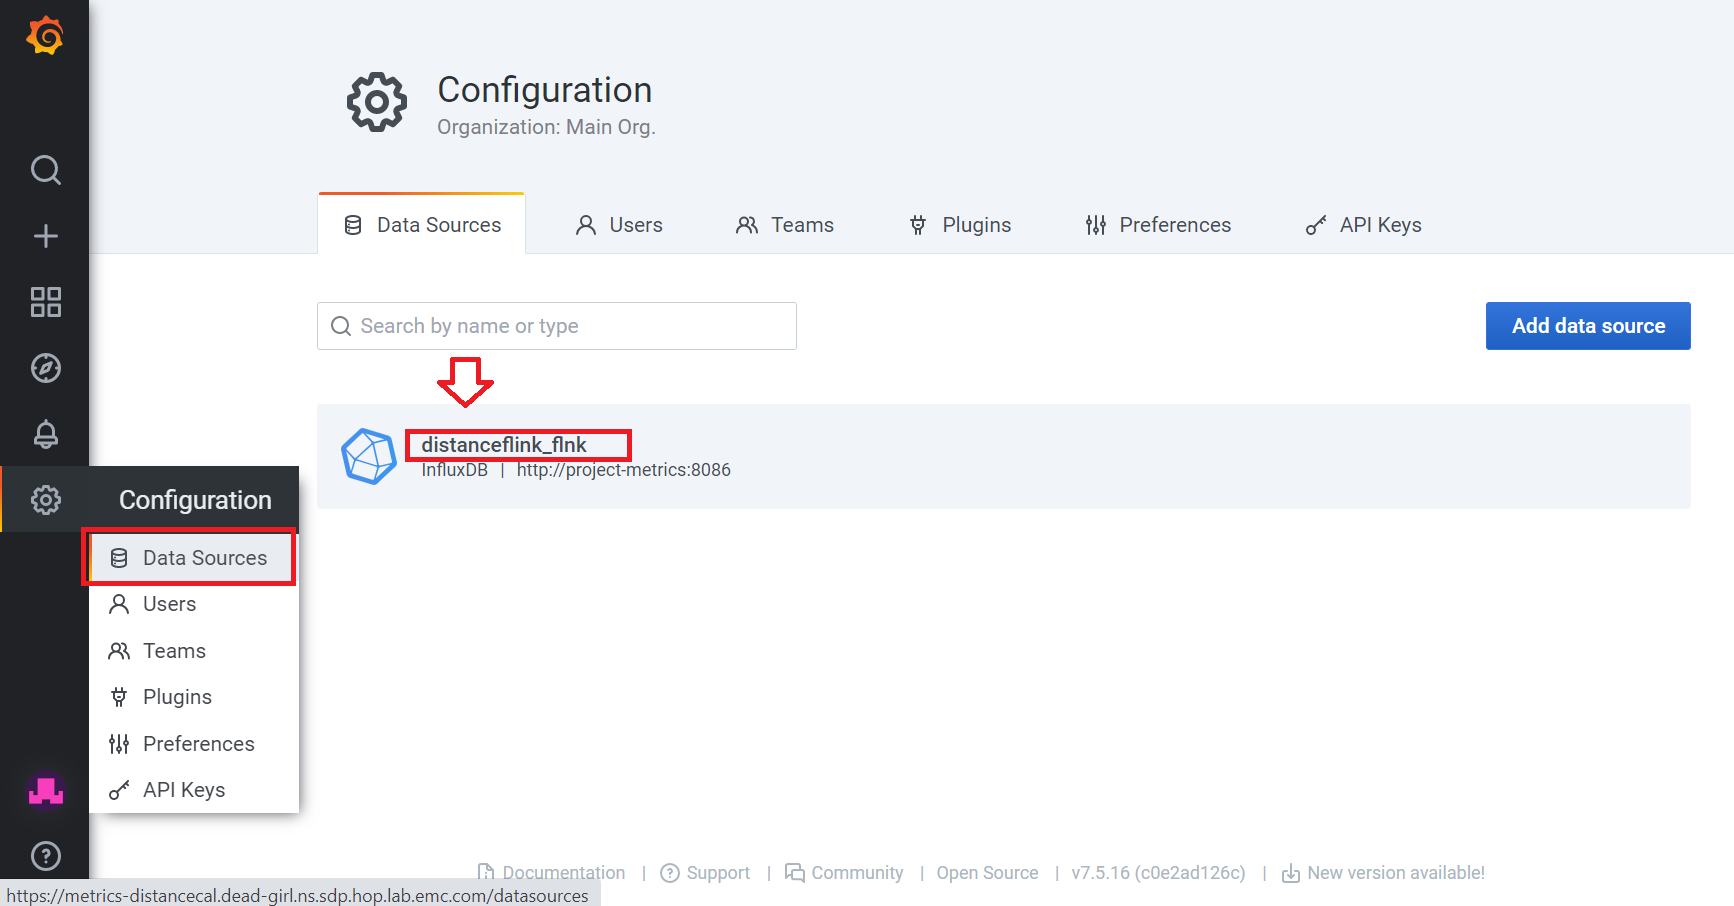
- Edit dashboard.json and replace datasource value from test_flnk to data_souce_name
8. Adding Dashboard in Grafana
- Navigate to Analytics → Your Project → Features
- Open Metrics endpoint
- Hover on Dashboard and Click on Manage
- Click on Import
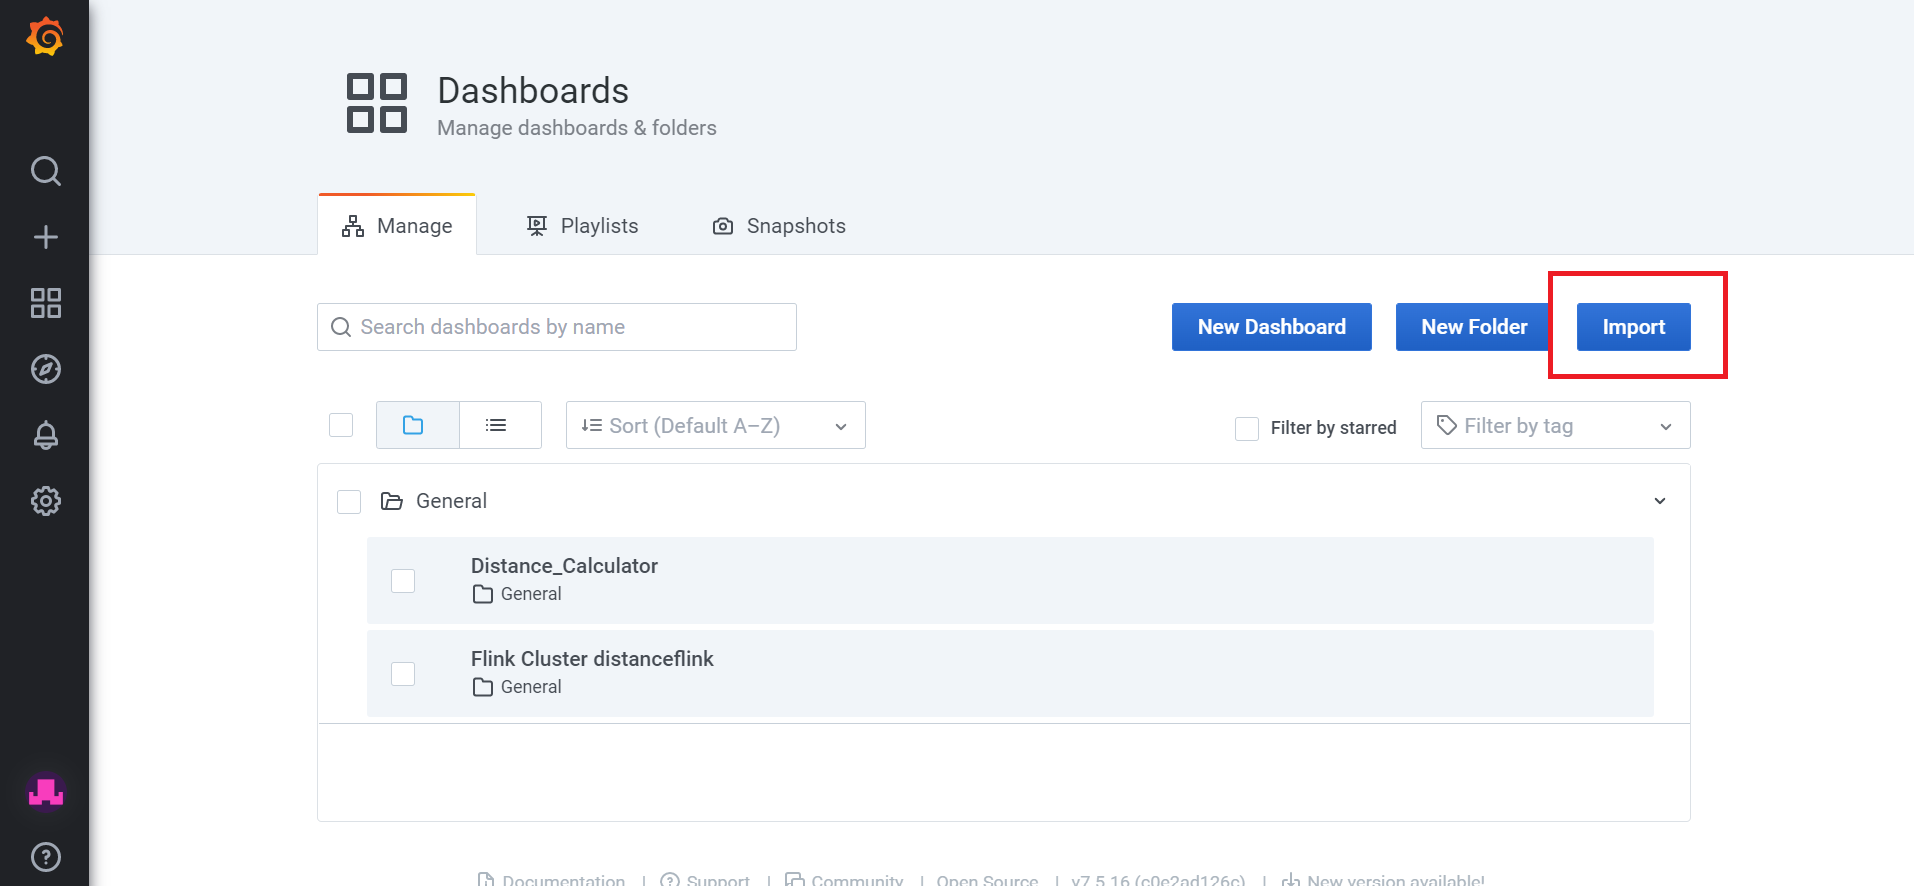
- Click Upload Json File → Select dashboard.json
- Below view can be observed
Source
https://github.com/vangork/sdp-starter-kit/tree/master/distance-calculator