Create Flink Project On Streaming Data Platform
Create Projects and Flink Clusters on Dell EMC Streaming Data Platform
Read Post
This is a general guide for creating and setting up Flink job on Dell EMC Streaming Data Platform.
Purpose
Apache Flink is the embedded analytics engine in the Dell EMC Streaming Data Platform which provides a seamless way for development teams to deploy analytics applications. This post describes the general instruction of using Apache Flink® applications with the Streaming Data Platform.
Instructions
1. Remove createScope method from the code
A. If you have used createScope method in Pravega standalone mode. Please comment out from your code since the SDP does not allow to create a scope from the code.
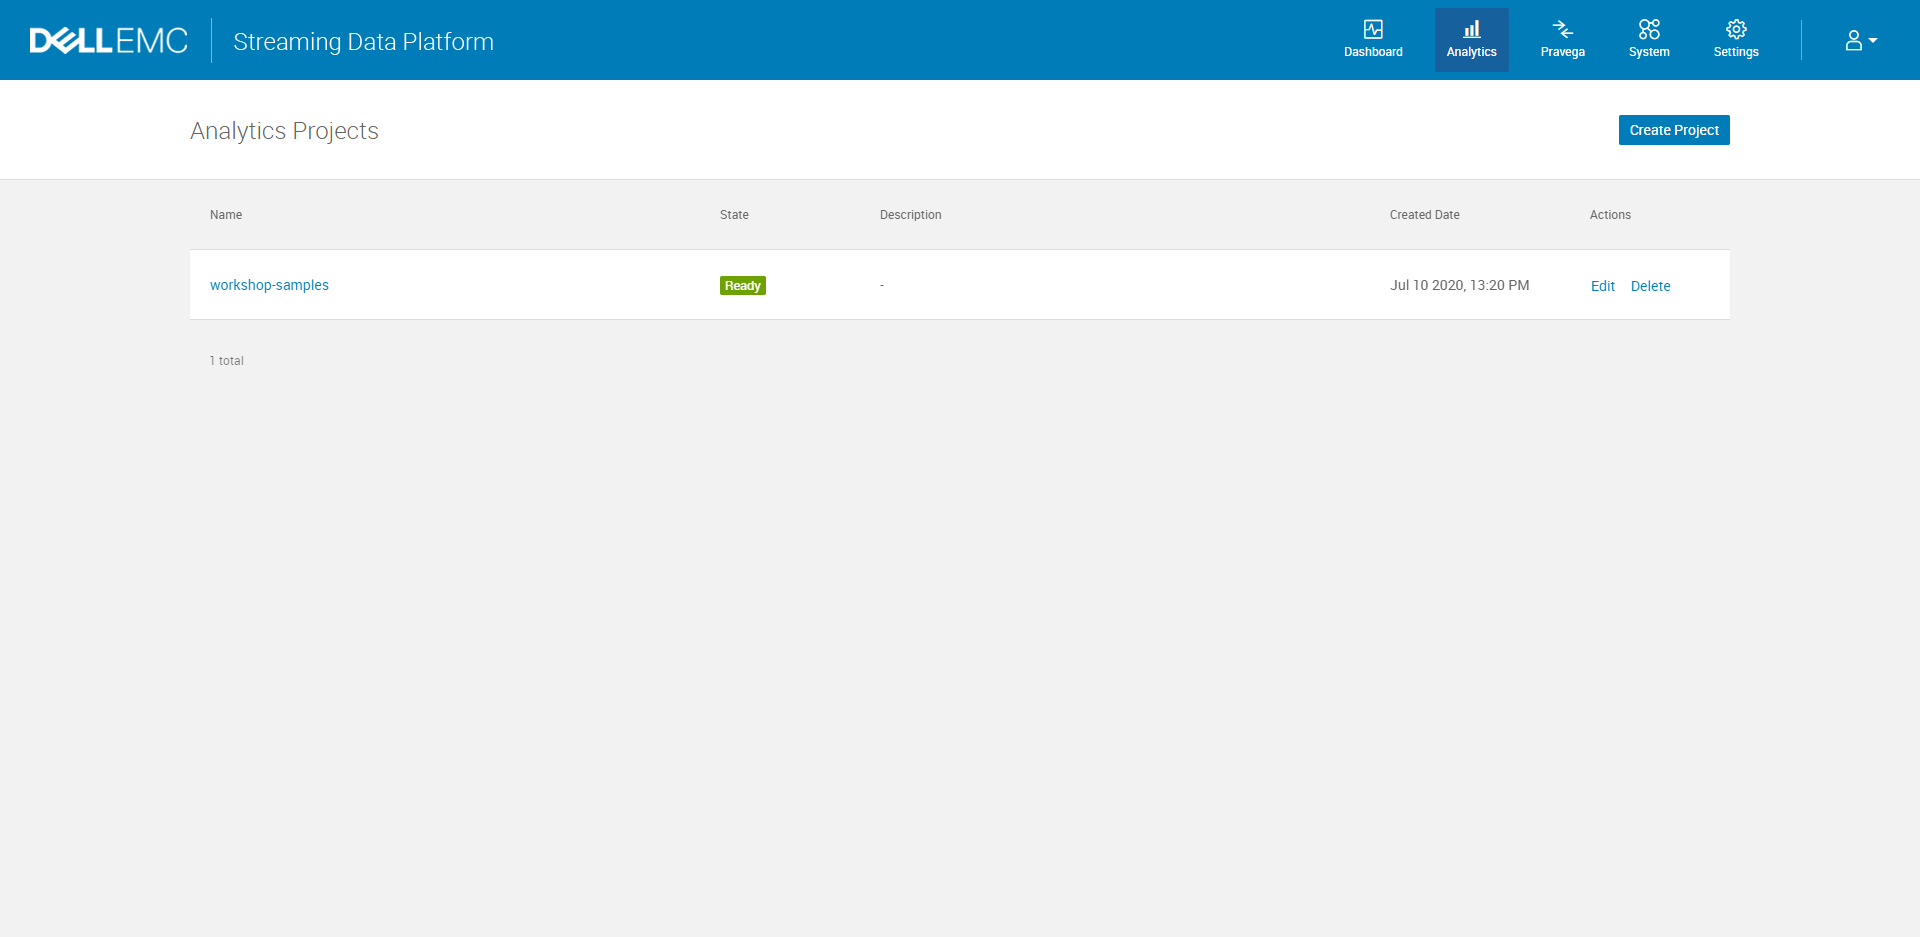
2. Create Projects
A. Log in to the Dell EMC Streaming Data Platform and click the Analytics icon to navigate to the Analytics Projects view which lists the projects you have access to.
 Note: If you cannot log in to the Dell EMC Streaming Data Platform, please use
 kubectl get ingress -A to find all ingress and add to your /etc/hosts file.
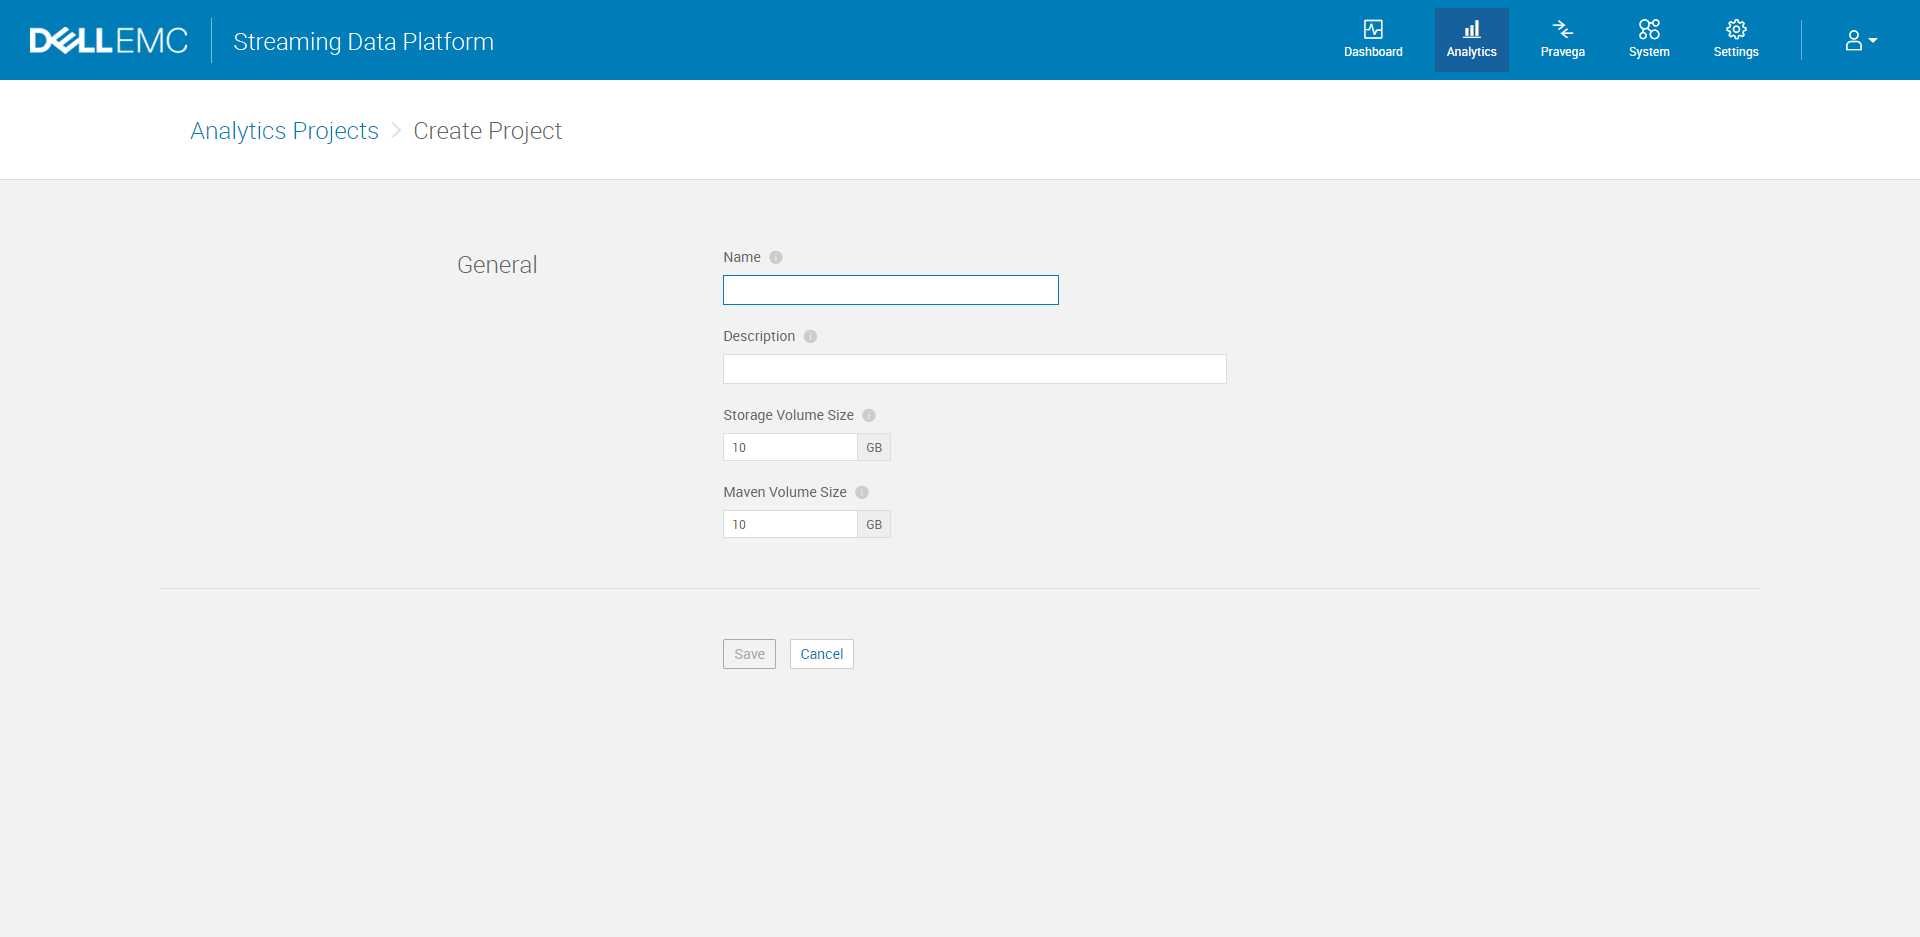
B. Click Create Project button to start with a new project by typing the project name, description and required volume size. This action will also automatically create a scope or namespace for your project in Pravega.
3. Upload Flink artifact to SDP
You must have all your artifact available on the SDP maven repository. There are two different ways for uploading your Flink job artifact:
Option A: Using the Dell EMC Streaming Data Platform UI
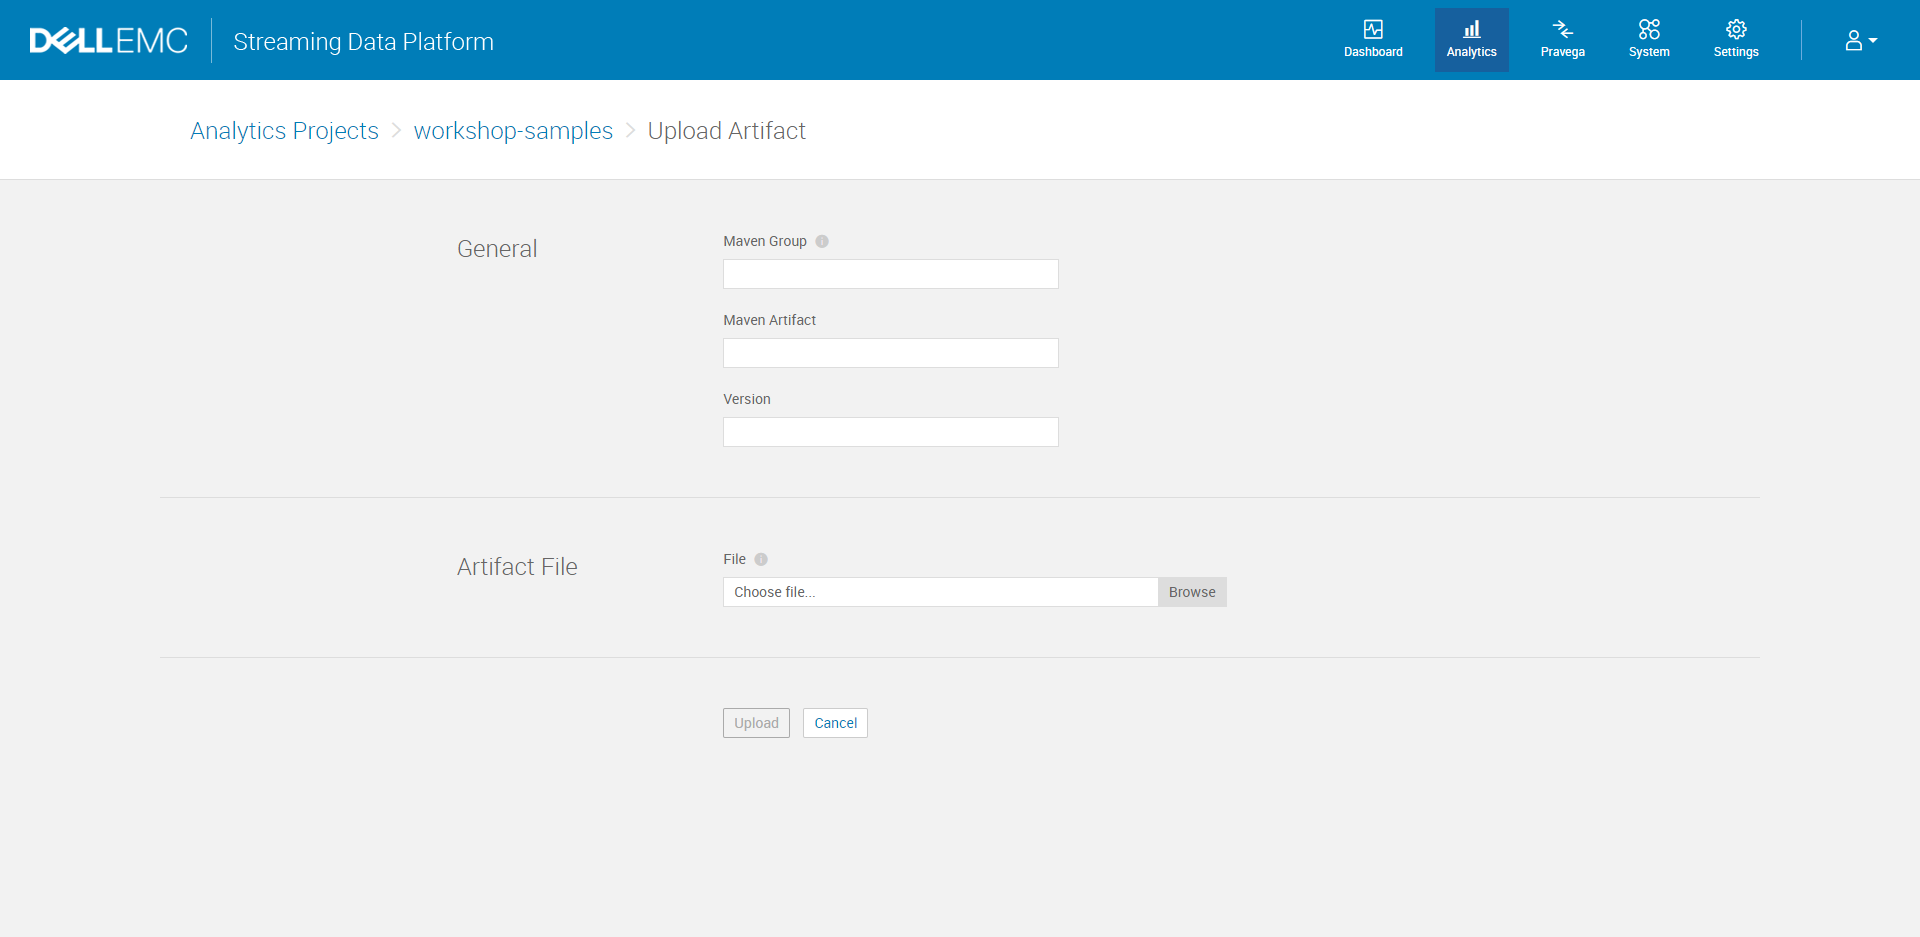
I. Navigate to Analytics > Analytics Projects > project-name > Artifacts
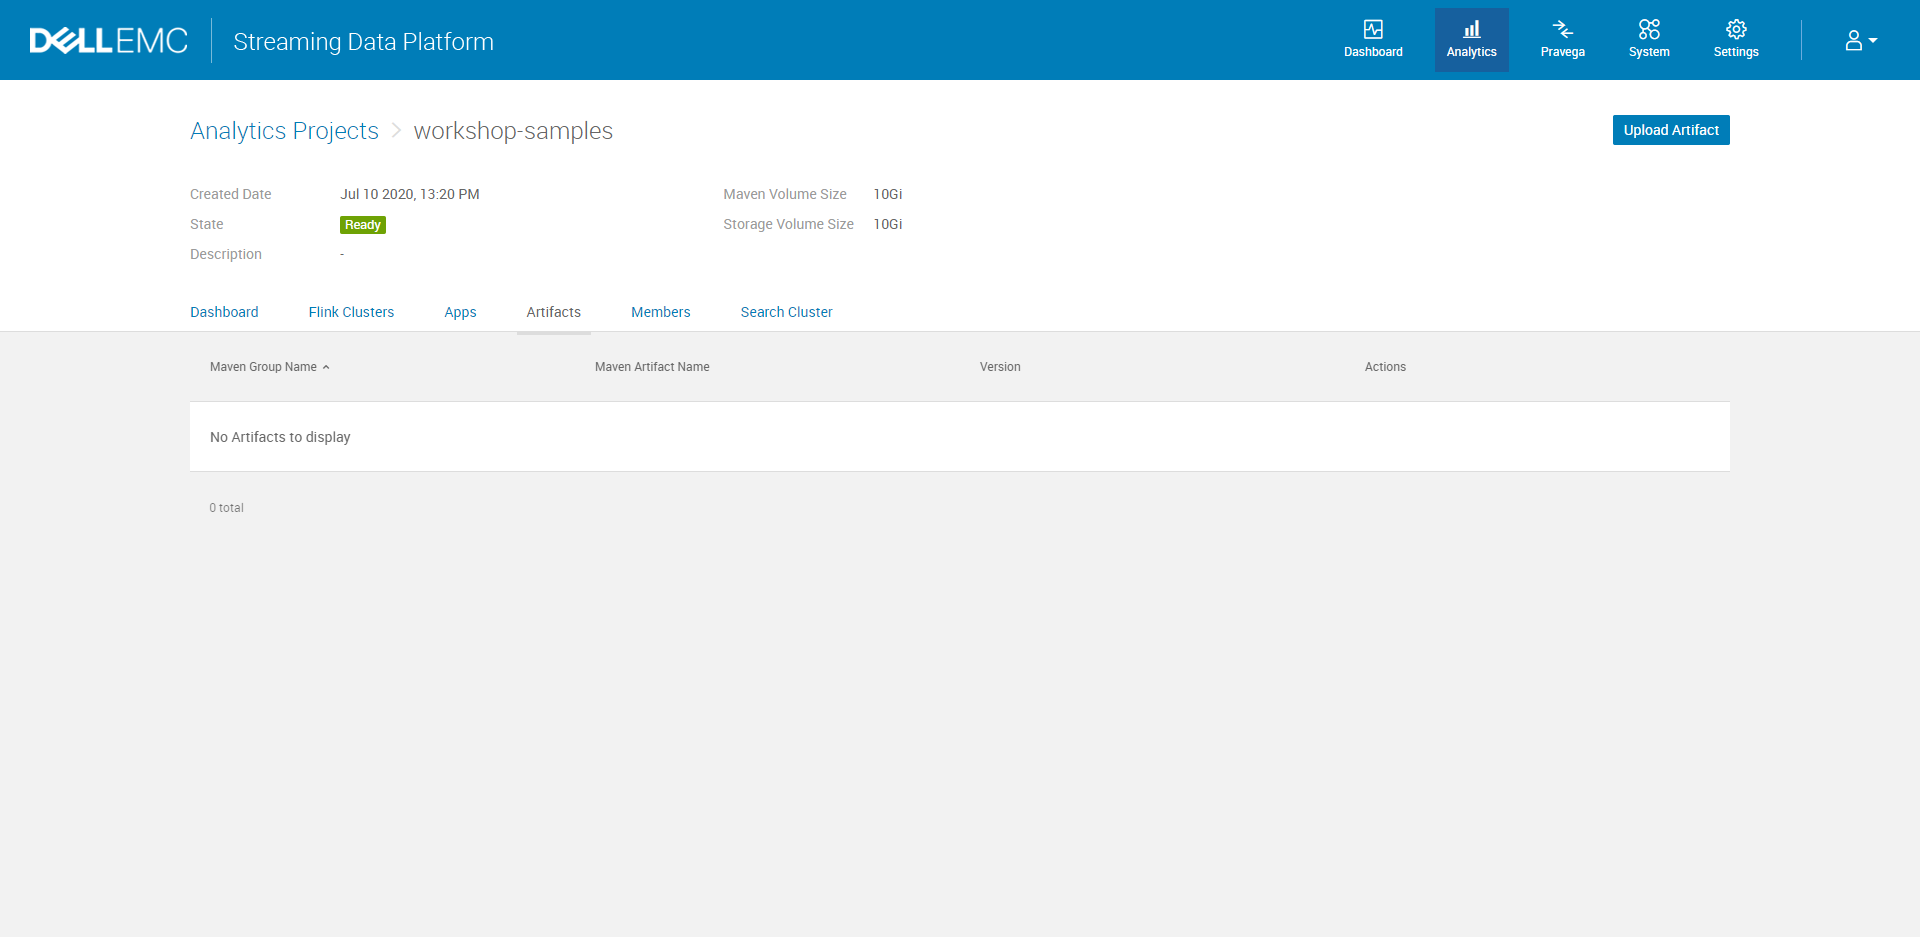
II. Click Upload Artifact. Under the General section, specify the Maven Group, the Maven Artifact, and enter the Version number. Under the Artifact File section, browse to the JAR file on your local machine and select the file to upload to the repository.
Option B: Using the Gradle Build Tool
I. Make the Maven repo in SDP available to your development workstation. Use kubectl ingress command to get the host and IP address for your namespace repo.
root@ubuntu:~$ kubectl get ingress -n your-namespace
NAME   HOSTS                                ADDRESS        PORTS   AGE
repo   repo.your-namespace.host.com       11.111.11.11      80     24h
If necessary, you may need to make changes to your hosts file. In order to so, find and open the hosts files which location, depending on the operating system that you are using, is:
- Windows -
C:\Windows\System32\drivers\etc\hosts - Linux -
/etc/hosts
Use vim, Sublime Text, or any other text editors to add the host and IP address information to the hosts file.
After this step, you should find a similar entry from your hosts file as following.
root@ubuntu:~$ cat /etc/hosts
    ...                           ...
    ...                           ...
    ...                           ...
    ...                           ...
11.111.11.11          repo.your-namespace.host.com
II. Add a publishing section to your build.gradle file.
The standard maven-publish Gradle plugin must be added to the project in addition to a credentials section. The following is an example build.gradle file.
Make sure to change the url to the corresponding information you get from the above step. Depending on the port number, the url protocol is:
80: http443: https
You may also need to customize the publication identity, such as groupId, artifactId, and version. If you publish shadow JARs, make sure to add classifier = "" and zip64 true to the shadowJar config.
apply plugin: "maven-publish"
publishing {
    repositories {
        maven {
            url = "http://repo.your-namespace.host.com/maven2"
            credentials {
                username System.getenv("MAVEN_USER")
                password System.getenv("MAVEN_PASSWORD")
            }
            authentication {
                basic(BasicAuthentication)
            }
        }
    }

    publications {
        maven(MavenPublication) {
            groupId = 'com.dell.com'
            artifactId = 'anomaly-detection'
            version = '1.0'
            from components.java
        }
    }
}
III. Set the environment variable for maven username and password.
Replace the default MAVEN_USER and MAVEN_PASSWORD with the same credentials used to login to the SDP UI. And run following export command in your terminal.
export MAVEN_USER=johndoe
export MAVEN_PASSWORD=**********
IV. Use the Gradle Extension either from IntelliJ IDEA or Command-Line Interface to publish the application JAR file to SDP.
4. Create Flink Clusters and Deploy Applications
Next, you need to create the Flink Clusters, and deploy the applications. There are two ways to complete the above tasks, through the UI on SDP or using Helm Charts.
Option A: Using Dell EMC Streaming Data Platform UI
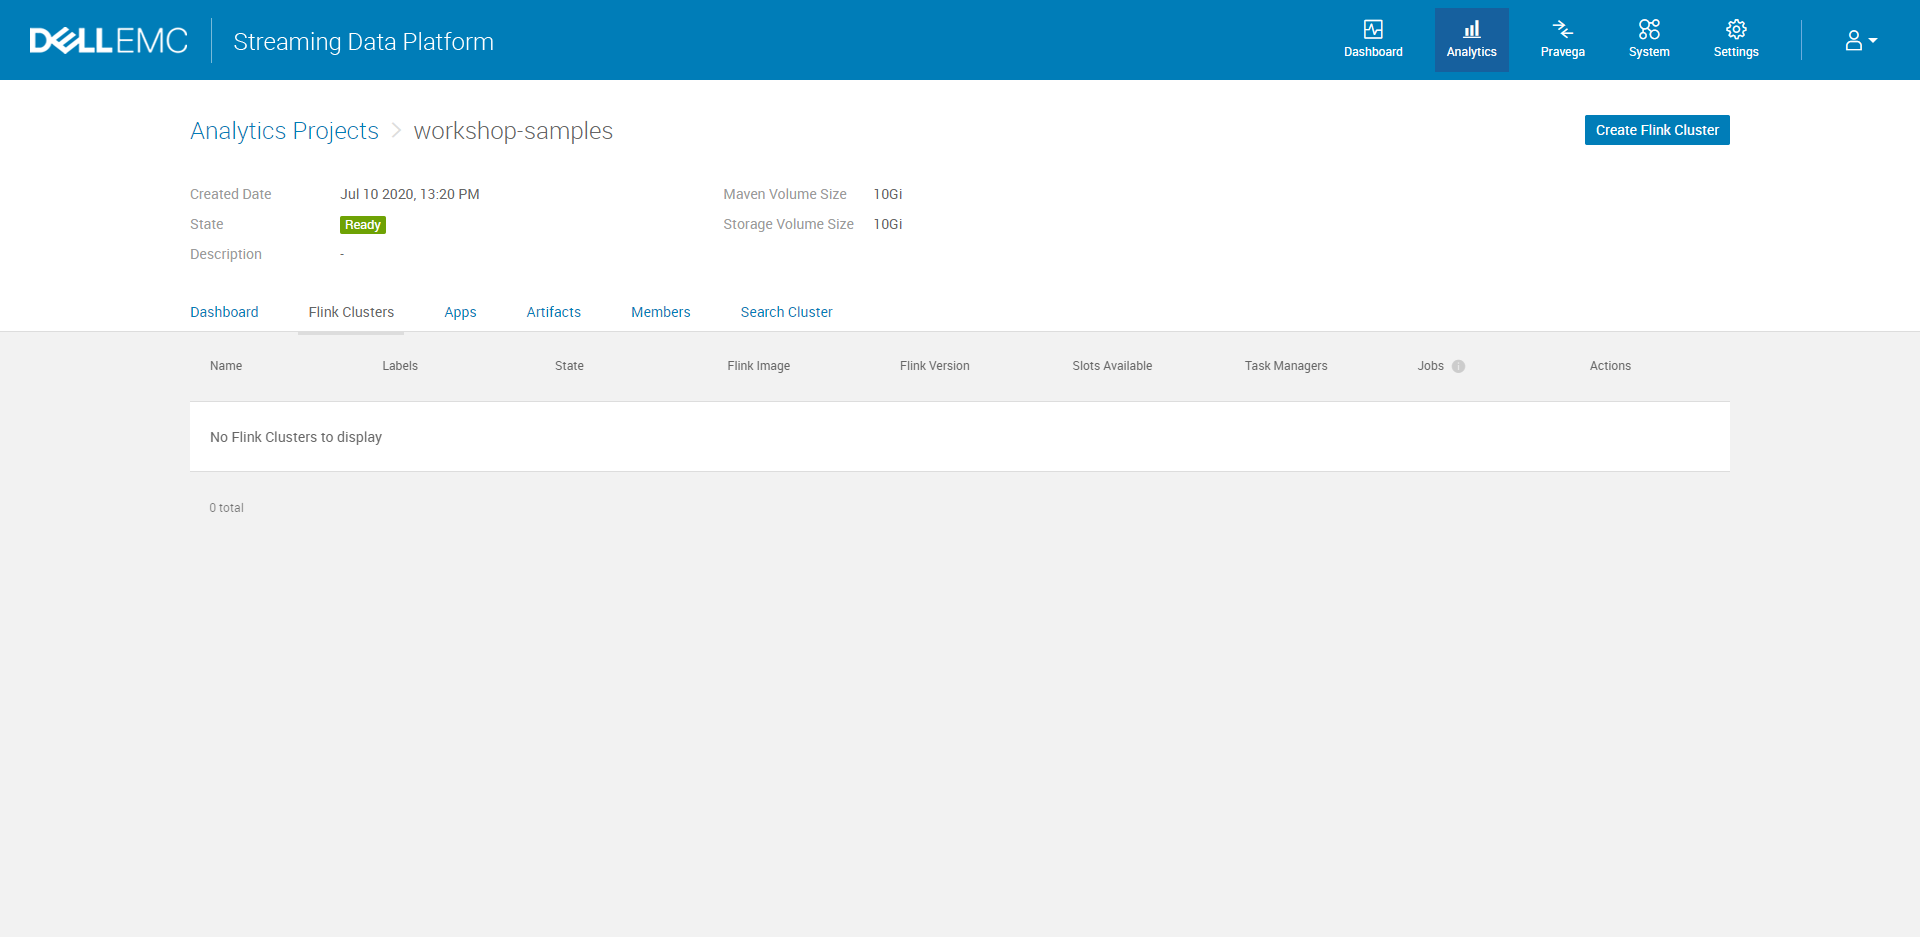
I. To create a Flink cluster using the Dell EMC Streaming Data Platform UI, navigate to Analytics -> project-name > Flink Clusters.
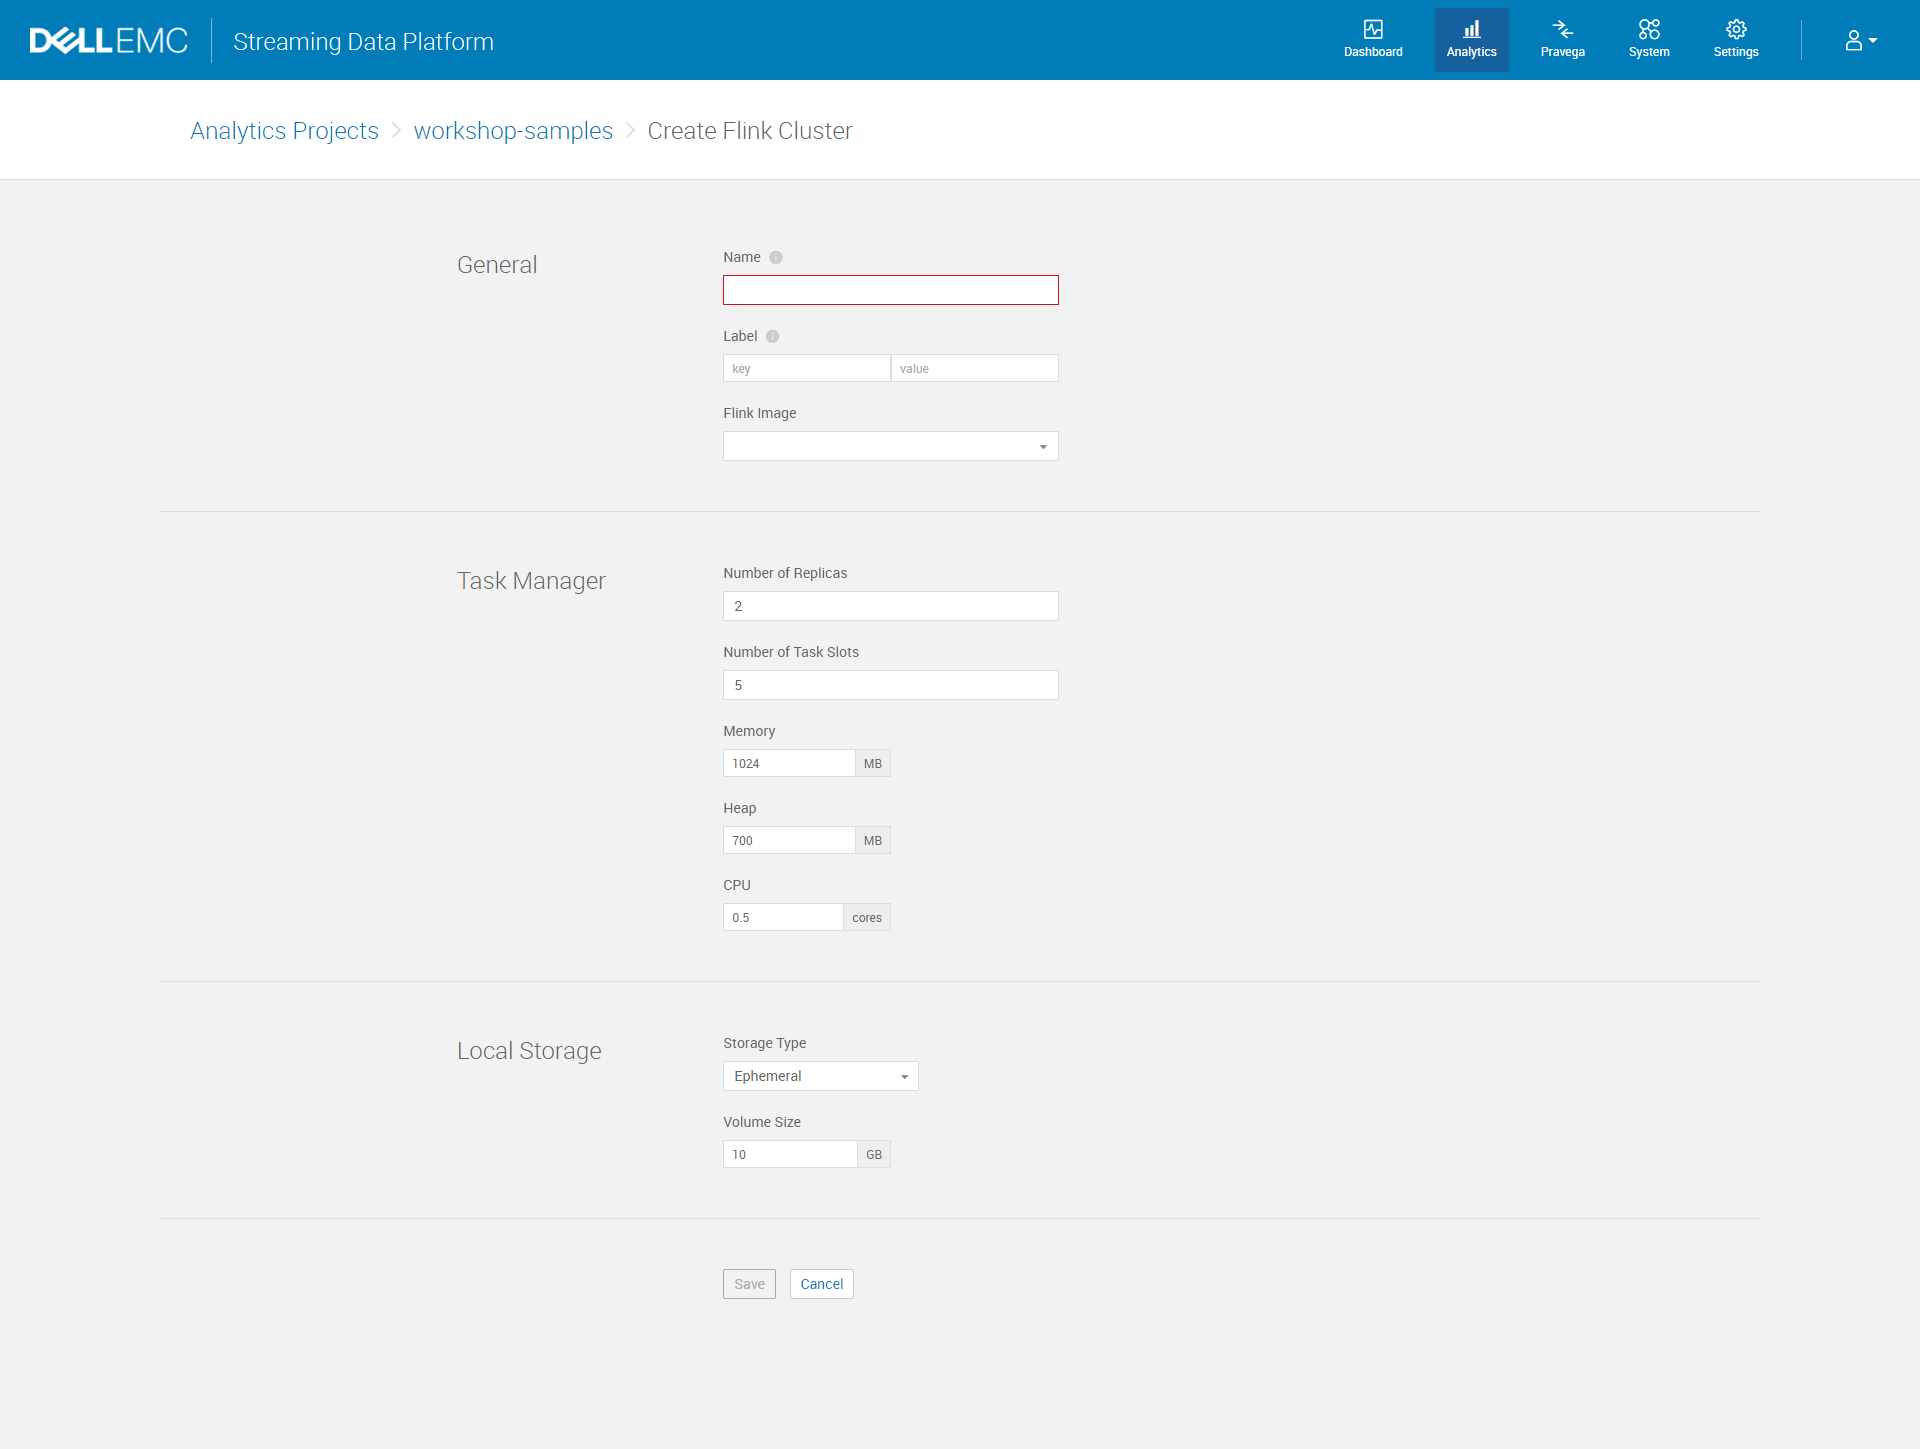
II. Click Create Flink Cluster and complete the cluster configuration fields.
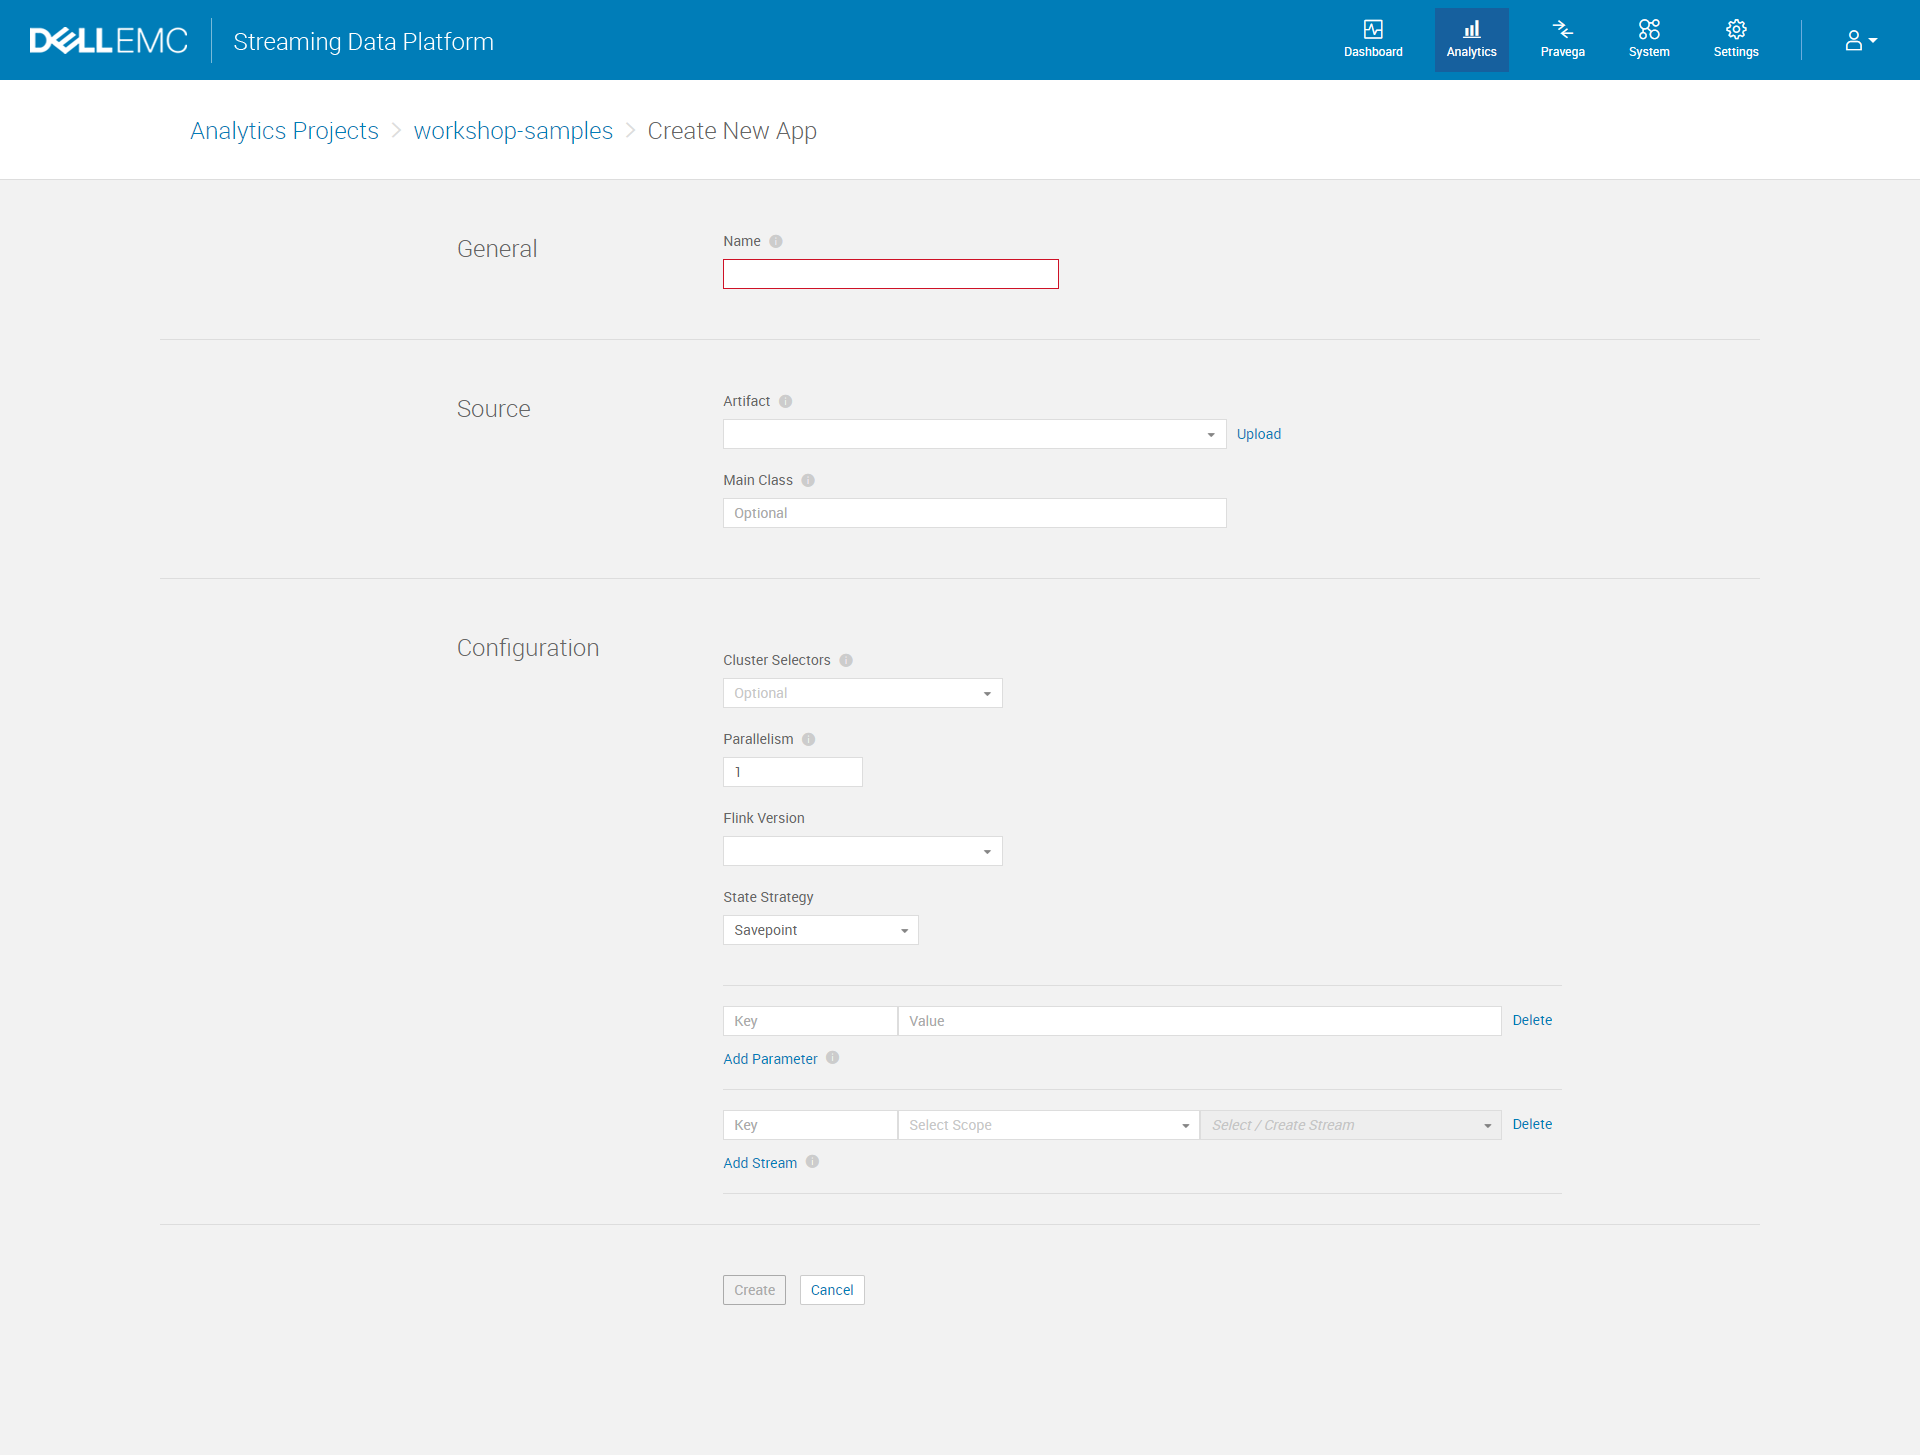
III. Navigate to Analytics > Analytics Projects > project-name > Apps
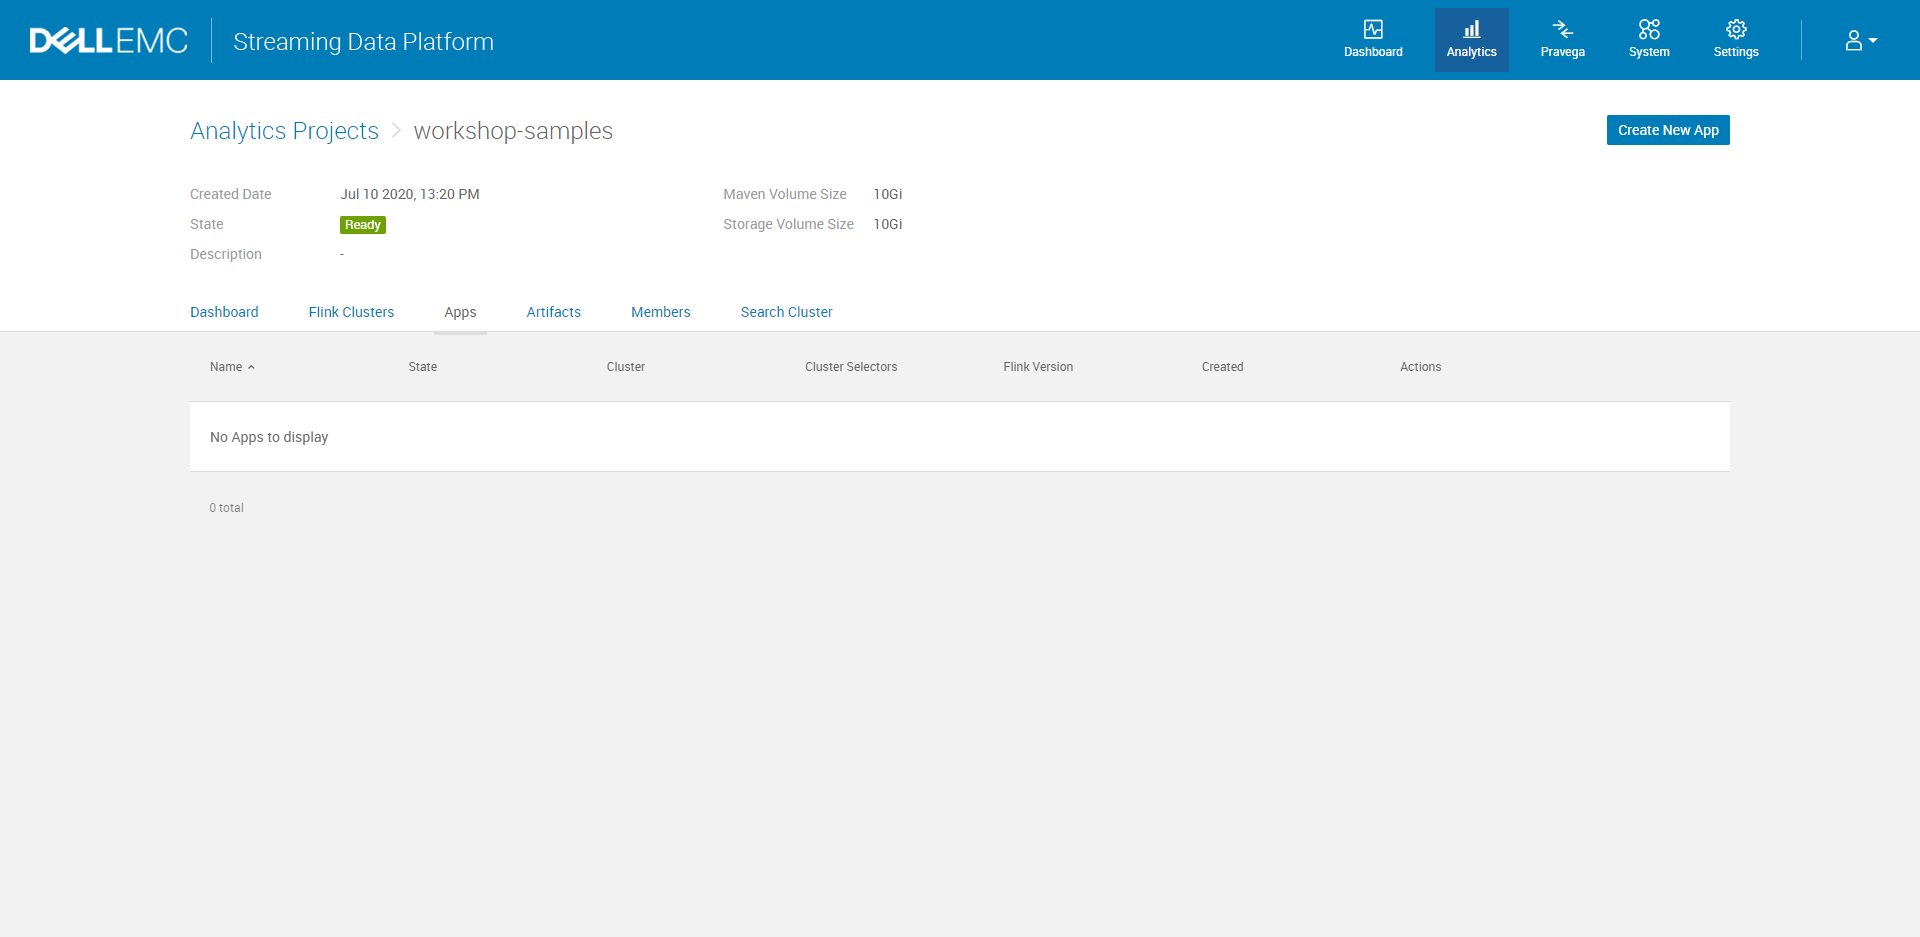
IV. Click Create New App. Specify the application name, the artifact source, main class, and other configuration information. You also have the chance to create a new Pravega stream for your application.
Option B: Using Helm Chart to deploy the application
I. Install Helm CLI into your local development environment.
Follow this guide to install Helm. It can be installed either from source, or from pre-built binary releases.
II. Generate the Helm Chart file structure
To use Helm Chart, you need to have a collection of files inside a directory. The directory should be named as charts. Then refer to this github repo, the Helm Charts documentation, and the following structure to organize your Chart file.
charts/               # A directory containing any charts upon which this chart depends
    ProjectName/         # This structure will allow one application per cluster
        templates/          # A directory of templates that, when combined with values,
                            # will generate valid Kubernetes manifest files.
III. Add yaml files to the Helm Chart file structure.
Next, follow the workshop-sample repo to add yaml files to your folder. You need to add Chart.yaml and values.yaml into ProjectName folder. Then create two templates yaml files for FlinkCluster, and FlinkApplication which will generate manifest files on the Kubernetes cluster, combining with the configuration in values.yaml.
We highly recommend one application per cluster. To do so, make sure to add spec.clusterSelector section to your FlinkApplication.yaml files, limiting Flink Application to a Flink Cluster. Once the application has been developed and tested in isolation, advanced users can optimize resources by sharing clusters. Your chart file structure should look similar to the following when using one application per cluster.
charts/
    ProjectName/
        Chart.yaml                          # A YAML file containing information about the chart
        values.yaml                         # The default configuration values for this chart
        templates/
            FlinkCluster.yaml               # Template file for Flink Cluster
            FlinkApplication.yaml           # Template file for your application.
IV. Add values file for each application
Besides setting the Flink cluster’s values, we also need to configure the properties for the application. Create a folder named values under the project home directory. And follow the workshop-sample repo to add values yaml file for each application. You can configure many settings in this yaml file such as application parameters, mainClass name, maven coordinate, and so on.
After this step, you should have a values folder with all the values file for each of your application.
charts/
    ProjectName/
        Chart.yaml                          # A YAML file containing information about the chart
        values.yaml                         # The default configuration values for this chart
        templates/
            FlinkCluster.yaml               # Template file for Flink Cluster
            FlinkApplication.yaml           # Template file for your application.
values/
    AplicationName.yaml                     # The configuration values for a specific application
          ...
          ...                               # You can have multiple applications.
          ...
V. Go to your project home directory
Since all chart files have been organized into a structure under the charts folder, you need to visit the parent directory of charts folder in order to install or upgrade the Helm Chart to SDP.
Take the following structure as an example; after this step, you should locate inside the FlinkApp folder.
FlinkApp/
    charts/
        ProjectName/
            Chart.yaml                          # A YAML file containing information about the chart
            values.yaml                         # The default configuration values for this chart
            templates/
                FlinkCluster.yaml               # Template file for Flink Cluster
                FlinkApplication.yaml           # Template file for your application.
    values/
        AplicationName.yaml                     # The configuration values for a specific application
            ...
            ...                                 # You can have multiple applications.
            ...
VI. Using Helm CLI to install or upgrade the charts
Open the terminal window from the project home directory that you access from the above step. Then you can use helm upgrade command to deploy your application and charts to SDP. The benefit of using helm upgrade is that if a release by this name doesn’t already exist, it will automatically run an install; otherwise, it will upgrade a release to a new version of a chart.
Make sure to replace the release name, path to project charts, namespace, and path to application values file with appropriate values.
./gradlew publish
helm upgrade --install --timeout 600s --wait \
    <release name> \
    <path to project charts>  \
    --namespace <namespace> \
    -f <path to application values file>
The following is an example that will create a release name jsonreader under workshop-samples namespace.
./gradlew publish
helm upgrade --install --timeout 600s --wait \
    jsonreader \
    charts/ProjectName  \
    --namespace workshop-samples \
    -f values/AplicationName.yaml
5. Check Project Status
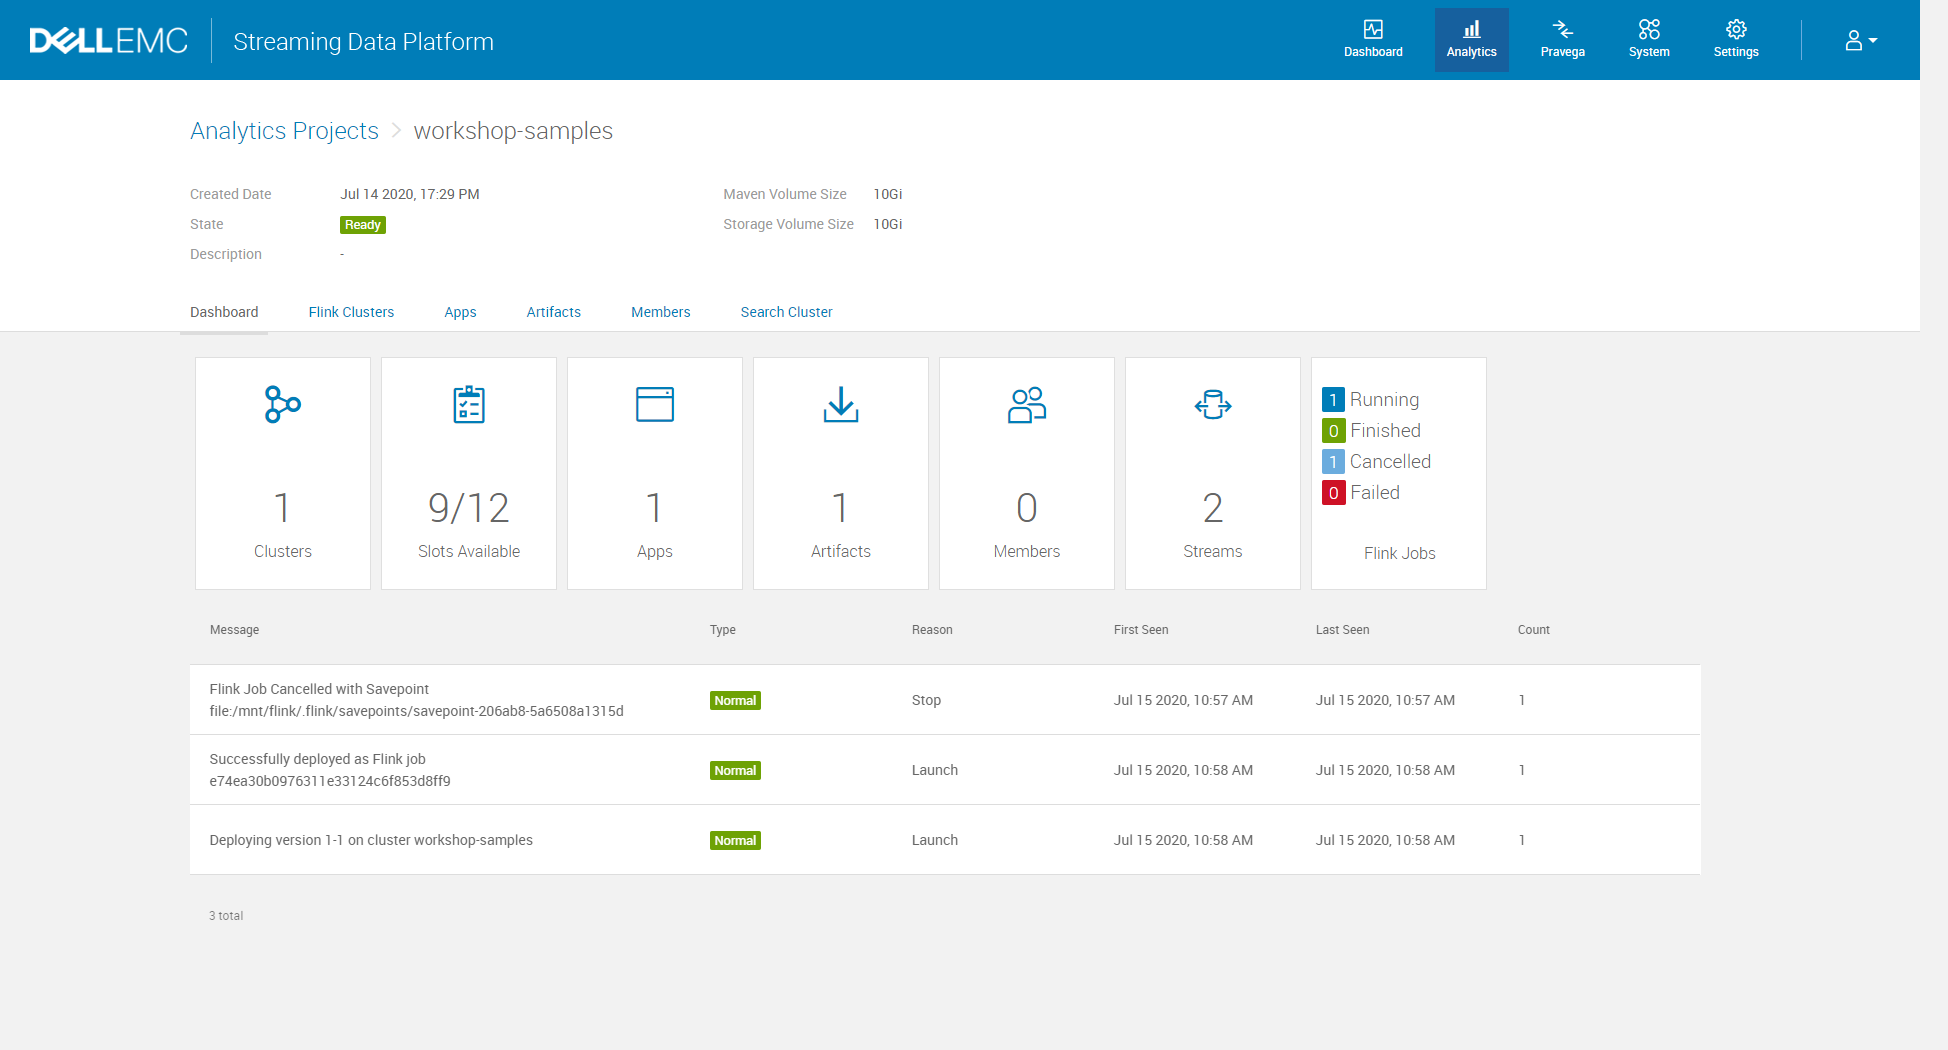
A. Navigate to Analytics > Analytics Projects > project-name. Use the links at the top of the project dashboard to view Apache Flink clusters, applications, and artifacts associated with the project.
Source
Dell EMC Streaming Data Platform InfoHub
Documentation
For the detailed description for each attribute on the configuration screen, please refer to the Dell EMC Streaming Data Platform Developer’s Guide.
